Everything written here are my sole opinions and observations and do not represent the opinions or observations of anyone else or any organization
With the reenacting season now over, I thought it a good idea to find something to keep this blog going for the off-season. Here and there I've been asked the question, "How do I become a reenactor?"
I've thought about answering the question with humor. After all, most of us are a bit nuts. On overly hot days--say in the nineties--we'll don wool trousers over cotton drawers, followed by a wool vest and wool jacket, a hat, a large leather belt with a cartridge box, percussion cap box, and bayonet hanging from it, a canteen full of water (a half gallon for those fully prepared), and a haversack full of various food items. For the excessively zealous, we'll also wear a 30-pound knapsack on our backs, or a quilted bedroll around our neck. And of course, there's the 5 to 10 pound musket on our shoulder.
And on wet days we'll add a poncho to keep our gear dry while the rest of us gets soaked to the bone (remember it's wool?) with mud up to our thighs.
And with all that on, in the heat of the day, we'll gather around the campfire with the smoke stinging our eyes just to add a bit of reenactor perfume to our countenance.
And on overly cold days we'll add a heavy greatcoat (a wool winter coat) to the mix along with fingerless gloves so that only our fingers, ears, and noses get frostbit. The smart ones protect their ears by flapping the greatcoat's cape over their head, but then any chance of seeing is gone.
When night falls, the daring will sleep on the ground between some tar-painted canvas and a rubberized poncho beside the campfire with a stack of logs--waking every so often during the night to throw another log of the fire, hoping they don't turn in their sleep and end up in the fire.
On the really cold nights, we sleep in our clothes, with a greatcoat or two on top of a ton of blankets to keep warm by, only to be immobilized by the weight of the blankets, yet still shiver from the cold.
Sound like fun?
I think it's a blast.
Of course, the height of the weekend is the battle, with only rain being the only show-stopper for the thrill (powder does not burn too well when wet). But even if it does rain, it's got to be a hurricane-level downpour to put a stop to our battles and our fun.
But there's also the time spent with friends who also share an interest in reenacting. We are all sorts of people--some are doctors, some work maintenance, some are architects, others police officers. Others, like me, are computer programmers, while still others are engineers. There are janitors and assembly-line workers among us. One I know is a city attorney who plays in a rock band. Heck, we've even got a comedian. As disparate our lives are, we all share one thing in common--Civil War reenacting.
So, now that I've sold you on all the perks, how does one become a reenactor?
Every reenactor has a different story as to how they got into the hobby. A few in the 1st Tennessee started as kids, even before they were old enough to carry a musket (16 is the minimum age to carry a musket on the field for the 1st Tennessee and for most companies). Others got into it late in life, stumbling on a reenactment, and offered a taste of the experience. When you find a good unit, they usually have enough spare gear to outfit you until you can get your own stuff, so you shouldn't have to dump a bunch of money down right away to get started--but you certainly can get the bug quick.
I'll start by telling my story, and finish by giving some tips as to how to get into the hobby, and how you might select a unit to join with. I'd love it if you found the 1st Tennessee Company B and join with us--but there are plenty of good companies out there--and some may be more suited to you than others.
Some time in the early 2000s, when I was still in my thirties, my wife dragged me to a Revolutionary War reenactment.
"Rev War?" you might ask. "I thought we were talking Civil War." Yeah--I'm getting to that.
To be continued...
A Civil War Re-enacting site, based around my experiences with the 1st Tennessee, Company B and the Independent Guard Battalion
Showing posts with label tips. Show all posts
Monday, November 11, 2013
Sunday, July 22, 2012
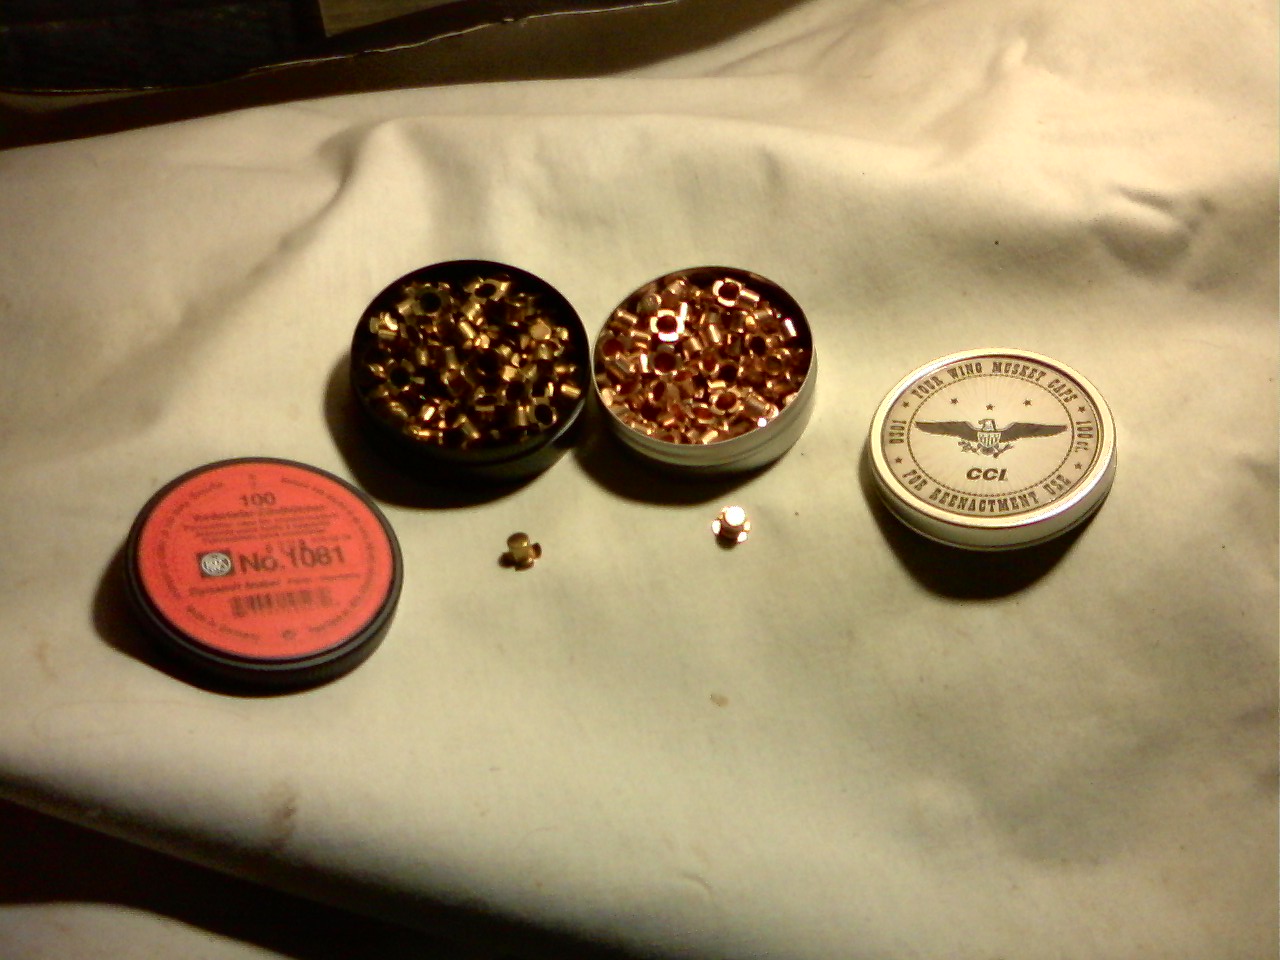
Analysis of Wingless Dynamit Nobel Caps
Performed at Fort Wayne, Indiana
July 15, 2012At the Fort Wayne event Zack Carte and I tested out the Dynamit Nobel wingless percussion caps that can commonly be found at sutlers. They have the appeal of being significantly cheaper than the normal RWS or CCI caps, so several of us have been curious to try them out to see if they could be used as an alternative.
The price of the wingless caps are between $5 and $6, about half the cost of the RWS and CCI 4 wing caps. However, these are probably not period correct, as all photos I have seen of dug up caps have wings.
Our examination as a possible alternative is for infantry only—for other purposes this review does not apply. For example, if you are cavalry and considering using these caps for your weapons, please ignore this review since the issues noted may not apply. This review is to take into consideration having men standing immediately next to you, on either side, and being affected by what you do. Cavalry, for example, is not likely to have someone in close proximity, unless dismounted.
We fired about 10 caps with no powder. Their behavior was similar to the 4 wing RWS. With one exception there was no tearing and no evidence these would fragment. In a control test we ran a few 4 wing RWS caps through the same testing and got nearly identical results—only one exception to no tearing or evidence of a risk of fragmentation. We then proceeded to fire 2 rounds double charged (about 130-140 grain) with no issue.
Our control tests included the 4 wing RWS caps, the 4 wing CCI caps and the 4 wing Navy Arms caps. As expected, and consistent with previous testing, the RWS and CCI caps had no issue, but the Navy arms caps showed tearing. The Navy Arms cap wrapped one wing around the hammer, tearing nearly in half.
From the perspective of risk of fragmentation, the caps are safe. However, they sparked brightly, like having a sparkler light up on the nipple. Zack reported others using these wingless caps in battle lines and getting sparks hitting his face, and based on the amount of sparking it is obvious how dangerous they can be to the eyes of all nearby. The biggest risk would be to a soldier in the front rank when fired from a soldier in the rear.
I personally test-fired a series in battle at Sharon Woods. I was at right end of line, so was in a safe position in relation to other soldiers. They are quite small and a bit difficult to manage, but that bright sparking was disruptive and disturbing. I supposed one could get used to it, but I do not like it. It was like having a firecracker at your face.
That sparking into the eyes of someone is enough to say that these caps should NEVER be used in infantry battle lines. If you always fight in skirmish lines only, or are not infantry—there is no issue. There is no fragmentation so they are safe from injury in that perspective, but sparking in close infantry lines is not something that should be risked. Any captain reading this should take the responsibility to pass this information on to his men to not use these caps out of consideration for the eyesight of his comrades.
Review of musket caps tests:
4 Wing CCI caps: acceptable. No fragmentation. Cost is about 20% less than the 4-Wing RWS caps. Regular use over time showed a bit of residue over the nipple after firing, which could potentially cause blockage if your nipple hole was small. My nipple hole is large and I have never encountered a problem. Reliability does seem to be a bit less than the RWS 4-wing caps. I have encountered about 1 per 100 that are outright duds (they were nothing but copper).4 Wing RWS caps: best choice, but the most expensive. Did experience fragmentation one time during battle from the soldier next to me, though I feel this was a fluke.
4 Wing Navy Arms caps: wings on the caps showed tearing after every firing, regardless of load, suggesting an unacceptable risk of fragmentation. Every double-charged load caused fragmentation. Price was comparable to the 4-Wing CCI caps, but they are difficult to find (at least here in Ohio).
Dynamit Noble Wingless caps: least expensive and reliable, but had a much brighter flash when fired that could be disconcerting until the soldier gets used to it. Also a risk of sparking in the eyes of soldiers on either side. Avoid if in infantry lines to prevent eye injury. If authenticity is important, you will need to pass on these anyhow as 4-wing caps are the period-correct choice.
6 Wing CCI caps: fired hot and loud. Price is nearly as inexpensive as the wingless caps. Almost don't need a powder load when firing one of these. Have not tested for fragmentation, but rumor has it that these are prone to fragment like the Navy Arms caps, though my experience suggest otherwise. I find these acceptable, but only if the entire unit is using them as you will stand out due to how much louder they are. They also have a bit more flash to them, but not as bad as the wingless Dynamit Noble caps. If authenticity is important, you will need to pass on these as 4-wing caps are the period-correct choice.
Tuesday, January 3, 2012
Restoring the Camp Chairs
It was at Nelsonville 2011 that I first tried to use my new
camp chairs, pictured above. I
found out in a hurry that the fabric was questionable at best—the fabric on
three of the chairs quickly tore after only a few minutes of sitting in them.
When I originally purchased them a couple of weeks before
Nelsonville, in July 2011, they were covered in mold. The seats had so much mold it was impossible
to determine the actual color of the seats.
But they looked promising. At the
time, I didn’t know anything about them—and apparently neither did the
vendor. They just looked a lot like the
modern reproduction camp chairs you see everywhere with the white canvas—except
these also had a back to them.
I’m not sure about the strength of the back—the design seems
that the back gives too much when you lean back, so I’d be afraid to put too
much weight against them. Other than
that, they are very strong chairs—much stronger than the modern reproduction
camp chairs without the backs that you see at reenactments.
To clean off the mold I simply used a scrub brush and hot
(near boiling) soapy water—using Dawn liquid soap. I tried using Murphy’s Oil soap on one of the
chairs instead, but Dawn seemed to work better.
I rinsed them as best I could (that fabric tended to hold onto that
soap), and let them dry in the sun. I
didn’t want to keep them in the sun any longer than I had to, but I wanted to
make sure to kill off any mold I might have missed.
Bear in mind that at this point my only purpose for
purchasing these chairs was to use them as camp chairs at reenactments. The two camp chairs I originally had both saw
their last days recently—the first I crushed as the nails I kept pounding in
finally gave way, while the second the canvas had gotten too weak for some
other reenactor. I hadn’t paid anything
for either of these chairs—they were campfire rescues—but now I needed
something and just happened to stumble on these at a flea market in Springfield , Ohio . When I first saw them, I almost passed them
up—only taking about 40 minutes to finally return to them and ask what they
wanted for them. I had fixed a price of
$20 in my head. The person watching the
vendor’s stuff had to call up the guy, and when they said $30, I almost walked away,
but I figured I could sell a pair of them off at $15 each and make my money
back.
Of course, everything changed once I researched the
chairs. My research on these chairs led
me to the 1866 patent (re-issued 1868),
manufactured by BJ Harrison and Company out of Arcanus, New York. I found this eBay link
showing one chair (in better
condition) for $100, and this other link
for one chair that was just the frame
for $175. I also saw a sutler at Zoar
selling three of these chairs, with fabric in worse shape than mine, but not
refinished (like mine were). He was
selling them for between $55 and $75.
The chairs were beautiful, but I could tell that they had
been re-finished, and not really the best job (a fingerprint is visible in a
couple of spots, there is obvious dripping in a few spots, and the finish was
missed in some of the more difficult to brush spots). The refinishing also apparently obscured the
signing stamp, as I could not find it anywhere—it should have been on the
backside of the base of the backrest.
The fabric was a type of carpet and looked very good after I cleaned
them up, but had significant wear spots in them—probably from a moth or
something. And as I mentioned, I
discovered later that the fabric was pretty well rotted and would not sustain
much use. In my research I found reason
to doubt the fabric was original, but it was likely the fabric was from the early
1900s—still very old.
In restoring these chairs my goal was not to restore them to
museum quality—simply to where I could use them in camp. This meant I was not concerned about the poor
re-finishing—I could feel safe about that getting messed up in camp. When that got to the point that something
needed done, then I could look at properly refinishing it, and correct the
mistakes of the last person to finish it (although I am tempted to take the
fingerprint to the police files to track down more of the history of the
chairs).
My first step was to remove the fabric from one of the
chairs. I wanted to completely finish
the work on one chair before touching any of the others so that I could use the
untouched chairs as guides. I hoped the
patent my help, but it really did not tell me much, other than the fabric could
be made of cloth, carpet, or some other “suitable pliable material”, and
secured “by any appropriate means to the front seat-rail”.
I first removed the part that could be used as a handle when
the chair was folded. This was held on
by two flat-head screws, which required a rather small screwdriver to fit in
the slots. After removing the screws,
the handle slid off the back posts quite well. Four larger flat-head screws
held down a flat securing board, which I removed. The securing board slid off the post just as
easily. Underneath the board were two
slots. The fabric was nailed with small
nails to the base of the back of the chair.
I carefully removed these screws with my screwdriver, hoping to reuse
them for the new fabric. A couple of the
nails were bent significantly, so I’ll need to find replacements before
securing the new fabric.
Upon removing the fabric, I found two metal rails in the base that fit into the slots of the securing board. These rails were simply laying snug into slots in the base. Part of one of the rails would not lay secure into its slot, but this is not an issue since the securing board would hold it all together.
| Metal post securing the fabric to the chair. |
| Thumbtack covering end of post. |
In the meantime, Jim and I were able to examine the carpets
Jeff provided and found that the material would be too thick to fit between the
wood and the post, so decided to pass on it.
I did find a close match to the ribbon at JoAnn Fabrics, so held onto a
couple of spools for when we found usable fabric for the seat. At a local hardware store, I found
replacement tacks for the back, where the fabric is tacked to the backrest.
| Carpet throws found at a yard sale for $5. |
| Carpet cut and black ribbon sewn on the edges. Original fabric is shown beside it. |
Putting the carpet on the first chair was
straight-forward. I simply slid the
carpet through the loosened post, pounded the post back into place (pushing the
wood plugs back into place as well), then sewed it to itself to assure it being
held in place. I bought new tacking
nails to replace the originals and pounded them into the carpet along the back
of the chair, then screwed the clamp back into the base and the final wood
dowel back at the bottom of the back of the chair. I left the caps off until I could figure
something out later.
The second chair was easy, now knowing what to do. However, the caps came off a little
differently. The first one came off with
its nail—and I realized these were just thumbtacks with large heads. On the first chair, the heads had simply
separated from their nail. When I went
to remove the second tack, its head separated like on the first chair.
I proceeded to remove the wood plugs by first pounding the
post with a bold one way until the first plug dropped, then pounding it the
other way. The nail from the second
thumbtack fell loose—it was only providing a façade over the wood plug. Once the wood plugs and remaining nail were
removed, the metal post fell loose and was easily removed by hand. I removed the old carpet and repositioned the
post for a small gap—just large enough to slide the new carpet onto it.
The new carpet provided enough tension against the post that
I needed to use a hammer to pound it back into place. I sewed the carpet against itself like the
first chair, replaced the wood plugs and the thumbtacks.
And now I had two finished chairs. I did discover that it was important to be
liberal with tacking the carpet to the rear rail. If insufficient tacking is
utilized, the carpet will eventually work its way loose with use. At Monroe
a fellow reenactor put a little too much pressure on one of the chairs, causing
the carpet to work free. At least it
was an easy fix.
| Finished product |
Tuesday, May 3, 2011
Analysis of Navy Arms Musket Caps
I recently visit a gun show in Columbus, Ohio and stumbled onto a vendor (The Ammo-Man, http://www.ermcollc.com/, out of East Rochester, Ohio) selling Navy Arms musket caps for $20 for a tin of 250 caps. Since this price is competitive with the RWS and CCI musket caps, I thought it prudent to test the caps out to determine if they’d be useful for re-enacting use. The more choices we have as reenactors, the more the competition, and the better the prices.
| Navy Arms Musket Caps tin |
I used my 1861 Armi-Sport Springfield for this test, like I did for the CCI caps. I capped (no powder) 10 caps, followed by two with powder. The caps seemed rather stiff—if you needed to squeeze them to keep them from falling off the nipple, you might have a problem. In my case, they were a rather snug fit onto the nipple of my Springfield—I had to give it a good push to fully seat it. In the middle of the ten, I slipped in one RWS cap to see if anyone would notice. The sound of all caps were about the same—you could not tell by the sound alone which one was the German cap, which seemed promising. You can always tell when someone is capping with one of the six wing CCIs—they fire pretty hot.
Unfortunately, we spotted a pattern with the Navy Arms caps. Every one of them had one of the wings knocked a bit farther out then the rest, with tearing all the way to the top of the cap—the caps fired with powder (about 65 grain) show about the same tearing.
| Spent Navy Arms cap. Note the tear into the head. |
I therefore added a new test—firing with a double-load (about 130 grain) and paper-rammed. Although paper-ramming is not something done during a battle, double-loading does happen. The paper-ramming would just pack the power enough to get a bit of extra compression. If the caps passed this test, then safety could be assured as this should be only an extreme condition.
Doing this last test twice produced exactly the same result—fragmentation. Both times the Navy Arms cap blew off one of its wings. This would be absolutely disastrous in a company line as it could seriously injure the man next to you. To confirm the results, I tested once more with a paper-rammed double charge with an RWS cap. The RWS cap hardly showed any difference—no fragmentation and no tearing.
The vendor I bought these caps from normally supplies them for the North-South Skirmish Association (http://www.n-ssa.org/), who does live-fire. He assured me these work well, but I assume he was not considering the safety factor while in a company line—they probably fire better for live-fire situations. I hope they only do it in skirmish lines or individually. In a skirmish line, or capping-off in a safe distance from others, you are probably okay to use these caps. But in a company line, you would not want to use the Navy Arms caps under any circumstances due to the danger of fragmentation.
Therefore I cannot recommend the Navy Arms Musket Caps for use by reenactors. Only if you absolutely never fire in a company line would you even want to consider using these. Every Civil War infantry unit should make it a clear company policy never to use these caps.
I never performed the paper-rammed double-charge on the CCI caps. At my next opportunity, I will perform that test to confirm the safety of the CCI caps and edit my review of those caps with the results.
EDIT (05/24/2011): I performed the double-charge test with the CCI caps, (here).
Wednesday, March 2, 2011
Analysis of the new CCI 4-wing percussion caps for reenactors.
All the sutlers at the Jackson, Michigan event last year that had percussion caps for sale sold the German RWS caps for about $12 for a can of 100 caps. However, most of these sutlers also had the new CCI 4-wing percussion caps designed for reenactors at $10 for a can of 100—and one sutler sold the caps for $8 for a can.
When the CCI 6-wing caps were available we avoided them—even prohibiting their use—due to their firing hot and ripping apart. The flying metal could risk injuring a fellow reenactor.
With these new 4-wing caps sold at a significantly cheaper price, I considered it worth investigating into the feasibility of using these as replacements for the German caps. I purchased one tin for testing.
I fired about 10 caps in Christine (my Springfield), priming only. All showed the same consistency in firing, and all stayed together. They seemed to pop about the same as a German cap, perhaps even slightly less, which brought up concerns of possibly misfiring in battle. However, during Sunday’s battle, up until I was taken out by that cannon, I used the CCI caps exclusively and did not have a single misfire—and all caps continued to show the same pattern after detonation that the prime-only firing showed the night before.
![]() |
| Musket percussion caps. On the left are the standard German RWS caps, while the right are the new 4-wing CCI caps. |
Therefore, it is my recommendation that we accept the CCI 4-wing Percussion Caps for Reenactors as an alternate and less expensive choice to the German RWS caps.
EDIT (05/24/2011):
In my analysis of the Navy Arms caps (here), I said I would also test the 4-wing CCI caps with a double load, like I did for the failed Navy Arms caps. At the Sunbury, OH I had my opportunity. I fired a double load off with a 4-wing CCI cap, and its behavior was similar to the German caps--no tearing or fragmentation. Therefore I am sticking with my recommendation that the 4-wing CCI caps are safe.
As an additonal note--for funsies, I tested a 6-wing CCI cap with a double load. I had never really done any kind of testing of the 6-wing caps--I had simply always been told that these can be dangerous and fragment badly, and took everyone's word for it. The 6-wing CCI cap does pop quite a bit hotter (ear protection is recommended, even when firing with no powder), but I was quite surprised to find that it did not fragment under such a charge. (I use about 65 grain in my charges, so this was exposed to about 130 grain.) Granted, I only tested one cap--perhaps this was an exception, but I'd have to say that it is safer to use a 6-wing CCI than it is to use the 4-wing Navy Arms caps. Still, unless I can see a signficant number tested with no tearing or fragmentation, I'd be much more comfortable knowing the guy next to me was not using them.
EDIT (09/20/2011):
After having used these caps for a season along with fellow reenactors, I have this small update: the caps tend to leave some excessive residue upon firing. I don't have much of a problem with this as my nipple has a good sized hole, but others with Enfields and a significantly smaller hole through their nipple have complained of excessive misfires due to this extra residue. I have had occasional unexplained misfires that could be attributed to the excessive residue. Fortunately for me, Christine is pretty good about getting over it--once she gets hot, she almost never misfires.
EDIT (05/24/2011):
In my analysis of the Navy Arms caps (here), I said I would also test the 4-wing CCI caps with a double load, like I did for the failed Navy Arms caps. At the Sunbury, OH I had my opportunity. I fired a double load off with a 4-wing CCI cap, and its behavior was similar to the German caps--no tearing or fragmentation. Therefore I am sticking with my recommendation that the 4-wing CCI caps are safe.
As an additonal note--for funsies, I tested a 6-wing CCI cap with a double load. I had never really done any kind of testing of the 6-wing caps--I had simply always been told that these can be dangerous and fragment badly, and took everyone's word for it. The 6-wing CCI cap does pop quite a bit hotter (ear protection is recommended, even when firing with no powder), but I was quite surprised to find that it did not fragment under such a charge. (I use about 65 grain in my charges, so this was exposed to about 130 grain.) Granted, I only tested one cap--perhaps this was an exception, but I'd have to say that it is safer to use a 6-wing CCI than it is to use the 4-wing Navy Arms caps. Still, unless I can see a signficant number tested with no tearing or fragmentation, I'd be much more comfortable knowing the guy next to me was not using them.
EDIT (09/20/2011):
After having used these caps for a season along with fellow reenactors, I have this small update: the caps tend to leave some excessive residue upon firing. I don't have much of a problem with this as my nipple has a good sized hole, but others with Enfields and a significantly smaller hole through their nipple have complained of excessive misfires due to this extra residue. I have had occasional unexplained misfires that could be attributed to the excessive residue. Fortunately for me, Christine is pretty good about getting over it--once she gets hot, she almost never misfires.
Tuesday, February 1, 2011
Painting your accouterments and Ground Cloth
I have Andrew Mott to thank for the following:
Oilcloth and Painted Accouterments
by Jack Cox
“Painting” was a 1800’s method of waterproofing cloth for such items as knapsacks, haversacks, belts, cartridge boxes and ground cloths. Properly done, the fabric does become very waterproof, but retains its flexibility.
There are many different recipes for both "period accurate" oilcloth and for a modern version that looks the same, but without some of the problems of the 1850's recipe. The paint is generally applied over cotton drill or linen canvas.
The instructions below discuss the making of ground cloths, but the same procedure applies to all painted goods.
Modern Recipe:
While this recipe is obviously not authentic, it produces the same look and feel as the original methods. The final product looks, feels and wears as close to the original as most of us can approximate today. However, you need to make a decision as to whether you want to "fake it" with a modern approximation when a good period recipe is available.
Materials:
Method:
Wallpaper sizing. Get it pre-mixed and ready to use.
Flat black or semi-gloss interior latex paint ***
Boiled linseed oil
Mineral spirits paint thinner
Japan dryer
(All of these materials are available at any good paint store)
1. Using a roller, paint both sides of the cloth with the wallpaper sizing and let it dry. It should take an hour or less. The sizing will prevent the paint from soaking the cloth, and it will give it some "tooth" for paint adhesion.
2. Using a roller, paint one side of the cloth with the black latex paint. Let it dry overnight.
3. Mix 2 parts of mineral spirits with 1 part boiled linseed oil. Add Japan dryer. Use 1 oz. (2 tablespoons) per pint of paint.
4. With a brush, paint the sized side of the cloth with the linseed oil mix. Let it dry. This may take several days, depending on temperature and humidity. It's NOT wise to let it dry in the house.
5. Paint on two additional coats of the linseed oil mix. Let it dry between coats.
*** There is a variation of this recipe that works very well also. Instead of using plain latex paint, mix 2 parts of latex paint with one part of boiled linseed oil. Stir it thoroughly, then follow the instructions above.
Period Recipe:
This recipe is an approximation, since the original recipe specified "litharge," or lead monoxide (PbO) which is extremely poisonous.
Bright Idea: Leave out the lampblack, and you have a recipe for a nice civilian waterproof cloth.
I strongly recommend this recipe because it is about as authentic as you can get without putting life and limb in danger.
Materials:
Boiled linseed oil
Mineral spirits paint thinner (or turpentine)
Lampblack (comes in tubes or dry powder)
Japan dryer
Corn starch
Method:
1. Make a sizing by boiling about a quart of water and adding cornstarch mixed in cold water until the mixture becomes a little syrupy.
2. dry.
3. Mix one part of boiled linseed oil with one part of mineral spirits. Add lamp black until the paint is a very opaque black. Add one oz. (2 tbsp) of Japan dryer per pint.
4. With a brush, paint the cloth with the blackened linseed oil and let dry. This can take several days.
5. Mix one part of boiled linseed oil with two parts of mineral spirits. Add one oz. of Japan dryer per pint.
6. With a brush, paint the cloth with the clear linseed oil mixture and let it dry. This can also take several days. Two coats of this mixture should give the results you want.
(You can omit the cornstarch sizing if you want, but the oil-based paint will pretty much soak the cloth.)
Paint the cloth with the cornstarch sizing and let
Confederate Ordnance Manual Recipe:
There is a recipe from the 1863 Confederate Ordinance manual which I have not tried. Use at your own risk.
Materials:
28 Parts lampblack
1 Part Japan varnish
73 Parts boiled Linseed oil
1 Part spirits of turpentine
1 Part litharge (substitute Japan Dryer for this.
Method:
Litharge is lead monoxide, and is very poisonous.)
1. Mix the ingredients, using 1 oz. (2 tbsp) of Japan dryer per quart of paint.
2. If you don't want the paint to totally soak the cloth, size it with cornstarch as in the period recipe above.
3. Apply 2-3 coats until the desired sheen is obtained.
Turpentine-base Recipe
This recipe comes from "Young's Demonstrative Translation of Scientific Secrets - 1861." This recipe will sound familiar in materials and proportion, but uses turpentine instead of mineral spirits for a thinner. Hazard Warning: The recipe uses litharge*** (poison hazard) and the mixture is boiled (fire hazard).
I DO NOT RECOMMEND OR ENDORSE USING THIS RECIPE.
Materials:
1 pint of spirits of turpentine
1 to 1 1/2 pints of linseed oil
1 lb litharge
Method:
1. Combine all materials in a large metal bucket. Litharge reacts strongly to aluminum and zinc. Do not use an aluminum or zinc coated vessel.
2. Boil and stir until thoroughly mixed and dissolved.
3. Paint on the cloth.
4. Let dry in the sun.
This recipe will give a clear to reddish or yellowish color, depending upon the base color of the litharge. The first coats could be tinted with lamp black to make a glossy painted oilcloth.
*** Safety data (MSDS) for litharge.
Oilcloth and Painted Accouterments
by Jack Cox
“Painting” was a 1800’s method of waterproofing cloth for such items as knapsacks, haversacks, belts, cartridge boxes and ground cloths. Properly done, the fabric does become very waterproof, but retains its flexibility.
There are many different recipes for both "period accurate" oilcloth and for a modern version that looks the same, but without some of the problems of the 1850's recipe. The paint is generally applied over cotton drill or linen canvas.
The instructions below discuss the making of ground cloths, but the same procedure applies to all painted goods.
Modern Recipe:
While this recipe is obviously not authentic, it produces the same look and feel as the original methods. The final product looks, feels and wears as close to the original as most of us can approximate today. However, you need to make a decision as to whether you want to "fake it" with a modern approximation when a good period recipe is available.
Materials:
Method:
Wallpaper sizing. Get it pre-mixed and ready to use.
Flat black or semi-gloss interior latex paint ***
Boiled linseed oil
Mineral spirits paint thinner
Japan dryer
(All of these materials are available at any good paint store)
1. Using a roller, paint both sides of the cloth with the wallpaper sizing and let it dry. It should take an hour or less. The sizing will prevent the paint from soaking the cloth, and it will give it some "tooth" for paint adhesion.
2. Using a roller, paint one side of the cloth with the black latex paint. Let it dry overnight.
3. Mix 2 parts of mineral spirits with 1 part boiled linseed oil. Add Japan dryer. Use 1 oz. (2 tablespoons) per pint of paint.
4. With a brush, paint the sized side of the cloth with the linseed oil mix. Let it dry. This may take several days, depending on temperature and humidity. It's NOT wise to let it dry in the house.
5. Paint on two additional coats of the linseed oil mix. Let it dry between coats.
*** There is a variation of this recipe that works very well also. Instead of using plain latex paint, mix 2 parts of latex paint with one part of boiled linseed oil. Stir it thoroughly, then follow the instructions above.
Period Recipe:
This recipe is an approximation, since the original recipe specified "litharge," or lead monoxide (PbO) which is extremely poisonous.
Bright Idea: Leave out the lampblack, and you have a recipe for a nice civilian waterproof cloth.
I strongly recommend this recipe because it is about as authentic as you can get without putting life and limb in danger.
Materials:
Boiled linseed oil
Mineral spirits paint thinner (or turpentine)
Lampblack (comes in tubes or dry powder)
Japan dryer
Corn starch
Method:
1. Make a sizing by boiling about a quart of water and adding cornstarch mixed in cold water until the mixture becomes a little syrupy.
2. dry.
3. Mix one part of boiled linseed oil with one part of mineral spirits. Add lamp black until the paint is a very opaque black. Add one oz. (2 tbsp) of Japan dryer per pint.
4. With a brush, paint the cloth with the blackened linseed oil and let dry. This can take several days.
5. Mix one part of boiled linseed oil with two parts of mineral spirits. Add one oz. of Japan dryer per pint.
6. With a brush, paint the cloth with the clear linseed oil mixture and let it dry. This can also take several days. Two coats of this mixture should give the results you want.
(You can omit the cornstarch sizing if you want, but the oil-based paint will pretty much soak the cloth.)
Paint the cloth with the cornstarch sizing and let
Confederate Ordnance Manual Recipe:
There is a recipe from the 1863 Confederate Ordinance manual which I have not tried. Use at your own risk.
Materials:
28 Parts lampblack
1 Part Japan varnish
73 Parts boiled Linseed oil
1 Part spirits of turpentine
1 Part litharge (substitute Japan Dryer for this.
Method:
Litharge is lead monoxide, and is very poisonous.)
1. Mix the ingredients, using 1 oz. (2 tbsp) of Japan dryer per quart of paint.
2. If you don't want the paint to totally soak the cloth, size it with cornstarch as in the period recipe above.
3. Apply 2-3 coats until the desired sheen is obtained.
Turpentine-base Recipe
This recipe comes from "Young's Demonstrative Translation of Scientific Secrets - 1861." This recipe will sound familiar in materials and proportion, but uses turpentine instead of mineral spirits for a thinner. Hazard Warning: The recipe uses litharge*** (poison hazard) and the mixture is boiled (fire hazard).
I DO NOT RECOMMEND OR ENDORSE USING THIS RECIPE.
Materials:
1 pint of spirits of turpentine
1 to 1 1/2 pints of linseed oil
1 lb litharge
Method:
1. Combine all materials in a large metal bucket. Litharge reacts strongly to aluminum and zinc. Do not use an aluminum or zinc coated vessel.
2. Boil and stir until thoroughly mixed and dissolved.
3. Paint on the cloth.
4. Let dry in the sun.
This recipe will give a clear to reddish or yellowish color, depending upon the base color of the litharge. The first coats could be tinted with lamp black to make a glossy painted oilcloth.
*** Safety data (MSDS) for litharge.
Sunday, January 2, 2011
Rolling the Civil War Overcoat
With the 150th anniversary of the first year of the Civil War coming, I've been getting things ready to campaign for one of the major battle re-enactments. I stumbled onto the below, concerning rolling the great coat and thought I'd share the information. I tried it myself and it does work pretty well. Below comes from a post by Doug Dobbs at http://www.dougdobbs.com/cwr/greatcoat/rolling%20overcoat.htm.
For all you Federal Reenactors (and you curious Confederates) out there, you may be wondering "how the heck did the original US soldiers carry those overcoats?" of course, you may not care, especially if you don't have an overcoat. But for me, I wanted to know. A little digging turned up the information that the soldiers carried them rolled, and on top of their knapsacks. But, "how did they roll them?" you might pontificate. Well, I too pondered the same perplexity, and answers were not forthcoming. I could find no printed instructions left over from the war. I have since learned that there were a few reenactors out there who chose not to share this info, well, they have been punished. Fortunately, one of the studliest members of the 15th US/1st Fla modified the World War I overcoat rolling procedure and scored a breakthrough. So here are the steps for rolling the overcoat thanks to Matt Wright.
Lay the overcoat flat and button all the front buttons and the buttons on the cape. However, undo the buttons on the back belt and pull the belt parts out from under the coat. Fold in the sleeves so that they run along the length of the front opening. Next, pull the cape away from the rest of the coat and form a clam-shell with it (check the picture.) Make sure the cape is even both left and right and that the edges of the cape meet evenly away from the coat.
Fold in the sides of the coat over the sleeves until they too run evenly along the front opening of the coat. Fold in the bottom of the coat a little more until it roughly has this shape \_/. It will make it easier to roll it tightly later.
While holding the roll with your knee, fold in the to corners of the 'clamshell' until they cross like in the picture. This step is crucial and you will undoubtedly have to unroll and repeat this step many times until you can get just the right
width to make a tight roll. The wing tips need to overlap, however, because they will eventually hold the roll in place. I didn't get a shot of what you do next, but you're smart you can figure it out. Fold the cape piece down (exactly as it is with that overlap) at the collar. You can see the collar line in the picture, it is right above the button. The cape will be facing the roll you are holding with your knee, with the opening in the cape towards said roll.
Now, take the roll with one hand, and grab the top two layers of the cape with the other hand. Simply roll the coat up into the opening, pulling the cape with one hand and rolling with the other. Be careful not to pull out the crossed wings of the cape or you will have to start over. If you find that the roll isn't very tight, roll the coat out of the cape, cross the cape tips a little tighter and try it again.

The photo on the left shows the finished coat. The one on the right is an original overcoat rolled up. Notice the similarity. Admittedly, I don't know if that coat has been rolled since the war, but other period photos I have seen show the same thing. Once you get the coat rolled, you can use it for a pillow, a football, and you can even carry it on your knapsack.
Rolling the Civil War Overcoat
For all you Federal Reenactors (and you curious Confederates) out there, you may be wondering "how the heck did the original US soldiers carry those overcoats?" of course, you may not care, especially if you don't have an overcoat. But for me, I wanted to know. A little digging turned up the information that the soldiers carried them rolled, and on top of their knapsacks. But, "how did they roll them?" you might pontificate. Well, I too pondered the same perplexity, and answers were not forthcoming. I could find no printed instructions left over from the war. I have since learned that there were a few reenactors out there who chose not to share this info, well, they have been punished. Fortunately, one of the studliest members of the 15th US/1st Fla modified the World War I overcoat rolling procedure and scored a breakthrough. So here are the steps for rolling the overcoat thanks to Matt Wright.
Step One
Lay the overcoat flat and button all the front buttons and the buttons on the cape. However, undo the buttons on the back belt and pull the belt parts out from under the coat. Fold in the sleeves so that they run along the length of the front opening. Next, pull the cape away from the rest of the coat and form a clam-shell with it (check the picture.) Make sure the cape is even both left and right and that the edges of the cape meet evenly away from the coat.
Step Two
Fold in the sides of the coat over the sleeves until they too run evenly along the front opening of the coat. Fold in the bottom of the coat a little more until it roughly has this shape \_/. It will make it easier to roll it tightly later.
Step Three
Roll the overcoat from the bottom towards the cape tightly and make sure it stays even on the sides. For some reason, this picture didn't come out too well, but the roll is about halfway, or right about where the back belt pieces come across. Once you get a good half-roll, put your knee on the roll to hold it in place.Step Four
While holding the roll with your knee, fold in the to corners of the 'clamshell' until they cross like in the picture. This step is crucial and you will undoubtedly have to unroll and repeat this step many times until you can get just the right
width to make a tight roll. The wing tips need to overlap, however, because they will eventually hold the roll in place. I didn't get a shot of what you do next, but you're smart you can figure it out. Fold the cape piece down (exactly as it is with that overlap) at the collar. You can see the collar line in the picture, it is right above the button. The cape will be facing the roll you are holding with your knee, with the opening in the cape towards said roll.
Step Five
Now, take the roll with one hand, and grab the top two layers of the cape with the other hand. Simply roll the coat up into the opening, pulling the cape with one hand and rolling with the other. Be careful not to pull out the crossed wings of the cape or you will have to start over. If you find that the roll isn't very tight, roll the coat out of the cape, cross the cape tips a little tighter and try it again.

The photo on the left shows the finished coat. The one on the right is an original overcoat rolled up. Notice the similarity. Admittedly, I don't know if that coat has been rolled since the war, but other period photos I have seen show the same thing. Once you get the coat rolled, you can use it for a pillow, a football, and you can even carry it on your knapsack.Wednesday, December 1, 2010
Period Dance 101
With the season wound down, I can't let my blog just sit dormant. Since I am a dance master (no matter how debatable that might be) I thought I'd give a brief primer to those who claim to have two left feet. After all, people of the Civil War era did not have television; they found other ways to entertain themselves. Dance was one of the most common ways to have fun. If you didn't know how to dance, you were probably raised by wolves and were not much of a social person, anyhow.
I always think it humorous to hear a Civil War soldier say they can't dance any of the period dances--when in reality they're pretty much already doing it when they go out and drill.
That's right--period dance is not all that different from drilling--just moving in a more confined space. You still start out with your left foot, and you step in cadence. When drilling someone in the ranks sings, you find it's easy to keep cadence--how much more so when you have a full band? This is actually one of the most complicated parts of period dance.
I'm not saying you're ready to do all the period dances--some of them are rather complex. But you are certainly ready to do the simpler and more common dances. You don't have to worry about remembering the figures--a good dance master will call the figures out until he's confident that everyone can go on their own (just like how the commanding officer will call out your next move when drilling). All you really need is a quick primer on the most common figures, so that when that figure is called, you'll know what to do.
We'll go over the Virginia Reel, which is the most common of all the period dances. This is one of the few dances that you will see at every ball and barn dance, so if you only know one dance, The Virginia Reel would be the one to know.
The dance itself can vary from ball-to-ball, but in general the simple figures below will be part of this dance, and these figures cover about eighty percent of all the figures used in the common and simpler dances. Get this dance down, and you'll have no problem winging it for the remaining of the simpler dances. You still may need a little assist on some of the more complex dances, but with practice, you'll be able to handle those as well.
Basic rules in period dance:
1. The lady is always to the gentleman's right when standing side-by-side at the start of a dance.
2. Sets (group of dancers) have a head and a foot. The head is always the end toward the musicians, the foot is always the end away from the musicians. Only if the set has to be reconfigured due to space restrictions would this be different. Not all dances use sets--some form a circle around the dance hall.
3. When the lady and gentleman must stand across from each other at the start of a dance, determine which side the lady should be on by facing the head of the set and follow rule #1. If these rules are ever broken, it is unlikely you are dancing a period dance.
The Virginia Reel is generally performed with six couples in each set. It can be performed with more or less, but six works the best.
Each of the following figures of the Virginia Reel is performed to eight counts--where each count is one step.
The first figure of the Virginia Reel is "Honor your partner". This is nothing more than a simple bow.
Next figure is a right-hand turn. Give your partner your right hand. In the center, both of you turn all the way around, and then return to your original place.
Now is the left-hand turn. Repeat what you did with the right-hand turn, only use your left hand instead.
Follow this with a two-hand turn. Just do what you did for the right-hand turn, only use both your hands.
Finally, you have what is known as do-si-do, sometimes also called back-to-back. You and your partner both take three steps forward, passing each other on each other's right side, followed by one step to the right (which now puts both of your backs to each other). Continue the remaining four steps back to your original place.
If you've had problems with the above, you are probably in remedial training for drill instruction.
At this point, the dance changes so that only the head couple dances. They start with a sashay down to the foot of the set, followed by a sashay back up to the head. A sashay is a sideways-skipping step. If you are not sure about what I mean, position yourself further down the set at the start of the dance and watch the other couples as they do this figure. No one is going to be particular if you don't get it right, but you don't want to be running down the set.
Once back at the head of the set, the head couple will do what is known as "Reel the Set" or "Strip the Willow"--both are terms for the same figure:
a right-hand turn one and a half times around,
followed by a left-hand turn with the lady on the outside
followed by a right-hand turn with your partner,
followed by a left-hand turn with the next lady in the line.
and continue until you reach the end of the line.
Once at the foot of the set, the head couple sashays back up to the head of the set. This is followed by what is termed "Casting off", meaning the proceed to turn and walk down the outside of the set. Although not all dancers do this, there is a correct way to turn when casting. For the gentlemen, it will be counter-clockwise (to your left), while for the ladies, it will be clockwise (to their right). Turning the other direction looks a bit clumsy and is not as elegant (as well as not being correct). Sometimes you will see couples honoring each other as they cast. Although the honor is not really necessary here, I think it does add a nice flair.
All dancers proceed to follow the head couple in casting off. The head couple will meet at the foot of the set (they'll have to do a best guess as to where that is since there won't be anyone there as markers) and form an arch with each other with both their hands. It is important to note that they should not try to hold hands (which is common for dancers to do). The reason is pretty simple--the dancers that have been following now have to go under your arch and step back into the two lines. If the head couple has locked hands with each other, that arch will be too narrow, as the dancers take their partners hand and try to step under that arch together. It will also likely be too low for the taller dancers who may have to bow pretty low to get under that arch. Finally, if that head gentleman is a private, and one of the other dancers is a general--well, it's just not good to make a ranking officer bow to a low-ranking soldier.
Once all the dancers have returned to place, the head couple that just did their arch will drop their hands and be the new foot couple. There will be a new head couple, and the dance starts again, until all dancers have had a turn at being the head couple.
So, for this dance, we covered the following figures:
Honor
Right-hand turn
Left-hand turn
Two-hand turn
Do-Si-Do
Sashay down the hall and return
Reel the Set (also known as Strip the Willow)
Cast
And that's a basic primer for most dances. Once you know and can dance the Virginia Reel, you can do most of the dances at the balls held at reenactment events. There are still a number of figures to learn, but I'll go over those in a different article.
I'm hoping to go over the Virginia Reel at the Regimental Dinner, so if you're in the 1st Tennessee, you'd better brush up on on this article. I'll see you there.
I always think it humorous to hear a Civil War soldier say they can't dance any of the period dances--when in reality they're pretty much already doing it when they go out and drill.
That's right--period dance is not all that different from drilling--just moving in a more confined space. You still start out with your left foot, and you step in cadence. When drilling someone in the ranks sings, you find it's easy to keep cadence--how much more so when you have a full band? This is actually one of the most complicated parts of period dance.
I'm not saying you're ready to do all the period dances--some of them are rather complex. But you are certainly ready to do the simpler and more common dances. You don't have to worry about remembering the figures--a good dance master will call the figures out until he's confident that everyone can go on their own (just like how the commanding officer will call out your next move when drilling). All you really need is a quick primer on the most common figures, so that when that figure is called, you'll know what to do.
We'll go over the Virginia Reel, which is the most common of all the period dances. This is one of the few dances that you will see at every ball and barn dance, so if you only know one dance, The Virginia Reel would be the one to know.
The dance itself can vary from ball-to-ball, but in general the simple figures below will be part of this dance, and these figures cover about eighty percent of all the figures used in the common and simpler dances. Get this dance down, and you'll have no problem winging it for the remaining of the simpler dances. You still may need a little assist on some of the more complex dances, but with practice, you'll be able to handle those as well.
Basic rules in period dance:
1. The lady is always to the gentleman's right when standing side-by-side at the start of a dance.
2. Sets (group of dancers) have a head and a foot. The head is always the end toward the musicians, the foot is always the end away from the musicians. Only if the set has to be reconfigured due to space restrictions would this be different. Not all dances use sets--some form a circle around the dance hall.
3. When the lady and gentleman must stand across from each other at the start of a dance, determine which side the lady should be on by facing the head of the set and follow rule #1. If these rules are ever broken, it is unlikely you are dancing a period dance.
The Virginia Reel is generally performed with six couples in each set. It can be performed with more or less, but six works the best.
Each of the following figures of the Virginia Reel is performed to eight counts--where each count is one step.
The first figure of the Virginia Reel is "Honor your partner". This is nothing more than a simple bow.
Next figure is a right-hand turn. Give your partner your right hand. In the center, both of you turn all the way around, and then return to your original place.
Now is the left-hand turn. Repeat what you did with the right-hand turn, only use your left hand instead.
Follow this with a two-hand turn. Just do what you did for the right-hand turn, only use both your hands.
Finally, you have what is known as do-si-do, sometimes also called back-to-back. You and your partner both take three steps forward, passing each other on each other's right side, followed by one step to the right (which now puts both of your backs to each other). Continue the remaining four steps back to your original place.
If you've had problems with the above, you are probably in remedial training for drill instruction.
At this point, the dance changes so that only the head couple dances. They start with a sashay down to the foot of the set, followed by a sashay back up to the head. A sashay is a sideways-skipping step. If you are not sure about what I mean, position yourself further down the set at the start of the dance and watch the other couples as they do this figure. No one is going to be particular if you don't get it right, but you don't want to be running down the set.
Once back at the head of the set, the head couple will do what is known as "Reel the Set" or "Strip the Willow"--both are terms for the same figure:
a right-hand turn one and a half times around,
followed by a left-hand turn with the lady on the outside
followed by a right-hand turn with your partner,
followed by a left-hand turn with the next lady in the line.
and continue until you reach the end of the line.
Once at the foot of the set, the head couple sashays back up to the head of the set. This is followed by what is termed "Casting off", meaning the proceed to turn and walk down the outside of the set. Although not all dancers do this, there is a correct way to turn when casting. For the gentlemen, it will be counter-clockwise (to your left), while for the ladies, it will be clockwise (to their right). Turning the other direction looks a bit clumsy and is not as elegant (as well as not being correct). Sometimes you will see couples honoring each other as they cast. Although the honor is not really necessary here, I think it does add a nice flair.
All dancers proceed to follow the head couple in casting off. The head couple will meet at the foot of the set (they'll have to do a best guess as to where that is since there won't be anyone there as markers) and form an arch with each other with both their hands. It is important to note that they should not try to hold hands (which is common for dancers to do). The reason is pretty simple--the dancers that have been following now have to go under your arch and step back into the two lines. If the head couple has locked hands with each other, that arch will be too narrow, as the dancers take their partners hand and try to step under that arch together. It will also likely be too low for the taller dancers who may have to bow pretty low to get under that arch. Finally, if that head gentleman is a private, and one of the other dancers is a general--well, it's just not good to make a ranking officer bow to a low-ranking soldier.
Once all the dancers have returned to place, the head couple that just did their arch will drop their hands and be the new foot couple. There will be a new head couple, and the dance starts again, until all dancers have had a turn at being the head couple.
So, for this dance, we covered the following figures:
Honor
Right-hand turn
Left-hand turn
Two-hand turn
Do-Si-Do
Sashay down the hall and return
Reel the Set (also known as Strip the Willow)
Cast
And that's a basic primer for most dances. Once you know and can dance the Virginia Reel, you can do most of the dances at the balls held at reenactment events. There are still a number of figures to learn, but I'll go over those in a different article.
I'm hoping to go over the Virginia Reel at the Regimental Dinner, so if you're in the 1st Tennessee, you'd better brush up on on this article. I'll see you there.
Subscribe to:
Posts (Atom)