Tuesday, May 24, 2011

In General Rosecrans stomping grounds

When you go to an event in the hometown of a Federal general, you’d expect to see a decent showing of Yankees.

The first and biggest mistake of the event held at Sunbury, Ohio--hometown of General William Rosecrans--was to schedule the event opposite two larger events (Conner Prairie, Indiana, and Sharon Woods in Sharonville, Ohio).  For the Saturday battle, we kept worrying that there’d only be three Yankees to shoot.  We figured we’d have to shoot them about 40 times each to make a decent battle.  There were a few more than that, at least, but the Rebels still outnumbered the Yankees.

As a warning to the event coordinators—do not schedule the event on this same date next year.  The 5th Kentucky was the only Confederate unit there—there were three of us from the 1st Tennessee (the official 1st Tennessee event was Sharon Woods), and we fell in with the 5th KY.  If this event is on the same date next year, the 5th KY has a prior commitment, and won’t be there.  The 1st Tennessee will be going to Sharon Woods, and I can assure you that the three of us at Sunbury this year will be going to Sharon Woods next year.  If you choose a different date, not only will you have the 5th KY, but probably a signficant number from the 1st Tennessee, as well.  So, unless you want nothing more than a 10 Yankee living history, a different date is highly recommended.

But besides that—it was a decent event, although the previous year was better.  The organization that was to supply the food bailed on them at the last minute, so the Saturday meals left something to be desired—a bagel for breakfast and a hot dog for dinner.  At least they had some time to prepare for a good Sunday breakfast of eggs and sausage.

I don’t really like to complain about inefficiencies of an event, because I always enjoy myself and want to see the event return for the next year.  It will take a lot to turn me against an event, and Sunbury is no different.  I enjoyed the event, and I want to see it return.  I say that so that a few criticisms can be taken seriously.  Although I was rather disappointed with the food, I can understand since your promised help failed to live to their promise.  It wasn’t the worst food I had at an event, anyhow (it’ll be tough to get worse than Granville’s last year in the mid-2000s—Ohio re-enactors are still talking about that).  But the event should have some kind of security during the Saturday battle.  This battle is fought on the streets around the town square, and not much was roped off, cars were parked in the battlefield area (nothing like firing a sniper shot through the window of a Honda Civic), and the public often did not know where they needed to be to stay out of the way of the infantry and cavalry.  It worked out, but there was the potential for something to go seriously wrong.  Sunday’s battle, held offsite at a local park, was at least clearly roped off, so the public had no question where they needed to be, but it would have been nice for those of us (like me) that are from out of town to have a nice sign at the park entrance for the battle.  A little public Frisbee golf course sign, with no park name, kind of threw me—I drove for 10 minutes out the highway before I realized that I must have missed it.

Even though this is an in-town event and small, these kinds of events are idea for finding new recruits.  Being a more laid-back environment, you can take the time to drill them sufficiently for the battle so that they can truly feel like they are a part of the company.

Tuesday, May 3, 2011

Analysis of Navy Arms Musket Caps

I recently visit a gun show in Columbus, Ohio and stumbled onto a vendor (The Ammo-Man, http://www.ermcollc.com/, out of East Rochester, Ohio) selling Navy Arms musket caps for $20 for a tin of 250 caps.  Since this price is competitive with the RWS and CCI musket caps, I thought it prudent to test the caps out to determine if they’d be useful for re-enacting use.  The more choices we have as reenactors, the more the competition, and the better the prices.

Navy Arms Musket Caps tin


I used my 1861 Armi-Sport Springfield for this test, like I did for the CCI caps.  I capped (no powder) 10 caps, followed by two with powder.  The caps seemed rather stiff—if you needed to squeeze them to keep them from falling off the nipple, you might have a problem.  In my case, they were a rather snug fit onto the nipple of my Springfield—I had to give it a good push to fully seat it.  In the middle of the ten, I slipped in one RWS cap to see if anyone would notice.  The sound of all caps were about the same—you could not tell by the sound alone which one was the German cap, which seemed promising.  You can always tell when someone is capping with one of the six wing CCIs—they fire pretty hot.

Unfortunately, we spotted a pattern with the Navy Arms caps.  Every one of them had one of the wings knocked a bit farther out then the rest, with tearing all the way to the top of the cap—the caps fired with powder (about 65 grain) show about the same tearing.
Spent Navy Arms cap.  Note the tear into the head.

I therefore added a new test—firing with a double-load (about 130 grain) and paper-rammed.  Although paper-ramming is not something done during a battle, double-loading does happen.  The paper-ramming would just pack the power enough to get a bit of extra compression.  If the caps passed this test, then safety could be assured as this should be only an extreme condition.

Doing this last test twice produced exactly the same result—fragmentation.  Both times the Navy Arms cap blew off one of its wings.  This would be absolutely disastrous in a company line as it could seriously injure the man next to you.  To confirm the results, I tested once more with a paper-rammed double charge with an RWS cap.  The RWS cap hardly showed any difference—no fragmentation and no tearing.

The vendor I bought these caps from normally supplies them for the North-South Skirmish Association (http://www.n-ssa.org/), who does live-fire.  He assured me these work well, but I assume he was not considering the safety factor while in a company line—they probably fire better for live-fire situations.  I hope they only do it in skirmish lines or individually.  In a skirmish line, or capping-off in a safe distance from others, you are probably okay to use these caps.  But in a company line, you would not want to use the Navy Arms caps under any circumstances due to the danger of fragmentation.

Therefore I cannot recommend the Navy Arms Musket Caps for use by reenactors.  Only if you absolutely never fire in a company line would you even want to consider using these.  Every Civil War infantry unit should make it a clear company policy never to use these caps.

I never performed the paper-rammed double-charge on the CCI caps.  At my next opportunity, I will perform that test to confirm the safety of the CCI caps and edit my review of those caps with the results.

EDIT (05/24/2011): I performed the double-charge test with the CCI caps, (here).

Friday, April 1, 2011

The 2011 Season

The 2011 season is upon us and I'm so looking forward to running around in wool on hot summer days and blowing powder.

I had been hopeful of enjoying my first national event this year, since this would be the 150th year since the first year of the Civil War--which pretty much would have mean 1st Manassas (Battle of Bull Run).  But our unit officers talked us out of it because of bad experiences they had at 1st Manassas in the past.  Well, next year is promising for a national, at least, and I'll be going to Guyandotte this year for their 150th.

A lot of events are planned--this will be my personal record year.  I have about 15 events planned, a number of which are not part of my unit, and more that just haven't been scheduled yet.  I'll try to keep up-to-date on this blog as I attend the events.  Most of the time I'll be wearing gray, but at least once I'll be in blue (which Girth will make sure I live up to).

Wednesday, March 2, 2011

Analysis of the new CCI 4-wing percussion caps for reenactors.


All the sutlers at the Jackson, Michigan event last year that had percussion caps for sale sold the German RWS caps for about $12 for a can of 100 caps.  However, most of these sutlers also had the new CCI 4-wing percussion caps designed for reenactors at $10 for a can of 100—and one sutler sold the caps for $8 for a can.

When the CCI 6-wing caps were available we avoided them—even prohibiting their use—due to their firing hot and ripping apart.  The flying metal could risk injuring a fellow reenactor.

With these new 4-wing caps sold at a significantly cheaper price, I considered it worth investigating into the feasibility of using these as replacements for the German caps.  I purchased one tin for testing.

I fired about 10 caps in Christine (my Springfield), priming only.  All showed the same consistency in firing, and all stayed together.  They seemed to pop about the same as a German cap, perhaps even slightly less, which brought up concerns of possibly misfiring in battle.  However, during Sunday’s battle, up until I was taken out by that cannon, I used the CCI caps exclusively and did not have a single misfire—and all caps continued to show the same pattern after detonation that the prime-only firing showed the night before.

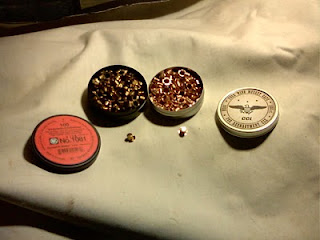
Musket percussion caps.
On the left are the standard German RWS caps,
while the right are the new 4-wing CCI caps.

Therefore, it is my recommendation that we accept the CCI 4-wing Percussion Caps for Reenactors as an alternate and less expensive choice to the German RWS caps.


EDIT (05/24/2011):
In my analysis of the Navy Arms caps (here), I said I would also test the 4-wing CCI caps with a double load, like I did for the failed Navy Arms caps.  At the Sunbury, OH I had my opportunity.  I fired a double load off with a 4-wing CCI cap, and its behavior was similar to the German caps--no tearing or fragmentation.  Therefore I am sticking with my recommendation that the 4-wing CCI caps are safe.

As an additonal note--for funsies, I tested a 6-wing CCI cap with a double load.  I had never really done any kind of testing of the 6-wing caps--I had simply always been told that these can be dangerous and  fragment badly, and took everyone's word for it.  The 6-wing CCI cap does pop quite a bit hotter (ear protection is recommended, even when firing with no powder), but I was quite surprised to find that it did not fragment under such a charge. (I use about 65 grain in my charges, so this was exposed to about 130 grain.)  Granted, I only tested one cap--perhaps this was an exception, but I'd have to say that it is safer to use a 6-wing CCI than it is to use the 4-wing Navy Arms caps.  Still, unless I can see a signficant number tested with no tearing or fragmentation, I'd be much more comfortable knowing the guy next to me was not using them.

EDIT (09/20/2011):
After having used these caps for a season along with fellow reenactors, I have this small update:  the caps tend to leave some excessive residue upon firing.  I don't have much of a problem with this as my nipple has a good sized hole, but others with Enfields and a significantly smaller hole through their nipple have complained of excessive misfires due to this extra residue.  I have had occasional unexplained misfires that could be attributed to the excessive residue.  Fortunately for me, Christine is pretty good about getting over it--once she gets hot, she almost never misfires.

Tuesday, February 1, 2011

Painting your accouterments and Ground Cloth

I have Andrew Mott to thank for the following:

Oilcloth and Painted Accouterments
by Jack Cox

“Painting” was a 1800’s method of waterproofing cloth for such items as knapsacks, haversacks, belts, cartridge boxes and ground cloths. Properly done, the fabric does become very waterproof, but retains its flexibility.

There are many different recipes for both "period accurate" oilcloth and for a modern version that looks the same, but without some of the problems of the 1850's recipe. The paint is generally applied over cotton drill or linen canvas.

The instructions below discuss the making of ground cloths, but the same procedure applies to all painted goods.

Modern Recipe:

While this recipe is obviously not authentic, it produces the same look and feel as the original methods. The final product looks, feels and wears as close to the original as most of us can approximate today. However, you need to make a decision as to whether you want to "fake it" with a modern approximation when a good period recipe is available.

Materials:

Method:

Wallpaper sizing. Get it pre-mixed and ready to use.
Flat black or semi-gloss interior latex paint ***
Boiled linseed oil
Mineral spirits paint thinner
Japan dryer
(All of these materials are available at any good paint store)

1. Using a roller, paint both sides of the cloth with the wallpaper sizing and let it dry. It should take an hour or less. The sizing will prevent the paint from soaking the cloth, and it will give it some "tooth" for paint adhesion.
2. Using a roller, paint one side of the cloth with the black latex paint. Let it dry overnight.
3. Mix 2 parts of mineral spirits with 1 part boiled linseed oil. Add Japan dryer. Use 1 oz. (2 tablespoons) per pint of paint.
4. With a brush, paint the sized side of the cloth with the linseed oil mix. Let it dry. This may take several days, depending on temperature and humidity. It's NOT wise to let it dry in the house.
5. Paint on two additional coats of the linseed oil mix. Let it dry between coats.

*** There is a variation of this recipe that works very well also. Instead of using plain latex paint, mix 2 parts of latex paint with one part of boiled linseed oil. Stir it thoroughly, then follow the instructions above.

Period Recipe:

This recipe is an approximation, since the original recipe specified "litharge," or lead monoxide (PbO) which is extremely poisonous.

Bright Idea: Leave out the lampblack, and you have a recipe for a nice civilian waterproof cloth.

I strongly recommend this recipe because it is about as authentic as you can get without putting life and limb in danger.

Materials:

Boiled linseed oil
Mineral spirits paint thinner (or turpentine)
Lampblack (comes in tubes or dry powder)
Japan dryer
Corn starch

Method:

1. Make a sizing by boiling about a quart of water and adding cornstarch mixed in cold water until the mixture becomes a little syrupy.
2. dry.
3. Mix one part of boiled linseed oil with one part of mineral spirits. Add lamp black until the paint is a very opaque black. Add one oz. (2 tbsp) of Japan dryer per pint.
4. With a brush, paint the cloth with the blackened linseed oil and let dry. This can take several days.
5. Mix one part of boiled linseed oil with two parts of mineral spirits. Add one oz. of Japan dryer per pint.
6. With a brush, paint the cloth with the clear linseed oil mixture and let it dry. This can also take several days. Two coats of this mixture should give the results you want.

(You can omit the cornstarch sizing if you want, but the oil-based paint will pretty much soak the cloth.)

Paint the cloth with the cornstarch sizing and let

Confederate Ordnance Manual Recipe:

There is a recipe from the 1863 Confederate Ordinance manual which I have not tried. Use at your own risk.

Materials:
28 Parts lampblack
1 Part Japan varnish
73 Parts boiled Linseed oil
1 Part spirits of turpentine
1 Part litharge (substitute Japan Dryer for this.

Method:

Litharge is lead monoxide, and is very poisonous.)

1. Mix the ingredients, using 1 oz. (2 tbsp) of Japan dryer per quart of paint.
2. If you don't want the paint to totally soak the cloth, size it with cornstarch as in the period recipe above.
3. Apply 2-3 coats until the desired sheen is obtained.

Turpentine-base Recipe

This recipe comes from "Young's Demonstrative Translation of Scientific Secrets - 1861." This recipe will sound familiar in materials and proportion, but uses turpentine instead of mineral spirits for a thinner. Hazard Warning: The recipe uses litharge*** (poison hazard) and the mixture is boiled (fire hazard).

I DO NOT RECOMMEND OR ENDORSE USING THIS RECIPE.

Materials:

1 pint of spirits of turpentine
1 to 1 1/2 pints of linseed oil
1 lb litharge

Method:

1. Combine all materials in a large metal bucket. Litharge reacts strongly to aluminum and zinc. Do not use an aluminum or zinc coated vessel.
2. Boil and stir until thoroughly mixed and dissolved.
3. Paint on the cloth.
4. Let dry in the sun.

This recipe will give a clear to reddish or yellowish color, depending upon the base color of the litharge. The first coats could be tinted with lamp black to make a glossy painted oilcloth.

*** Safety data (MSDS) for litharge.

Sunday, January 2, 2011

Rolling the Civil War Overcoat

With the 150th anniversary of the first year of the Civil War coming, I've been getting things ready to campaign for one of the major battle re-enactments.  I stumbled onto the below, concerning rolling the great coat and thought I'd share the information. I tried it myself and it does work pretty well.  Below comes from a post by Doug Dobbs at http://www.dougdobbs.com/cwr/greatcoat/rolling%20overcoat.htm.

Rolling the Civil War Overcoat


For all you Federal Reenactors (and you curious Confederates) out there, you may be wondering "how the heck did the original US soldiers carry those overcoats?" of course, you may not care, especially if you don't have an overcoat. But for me, I wanted to know. A little digging turned up the information that the soldiers carried them rolled, and on top of their knapsacks. But, "how did they roll them?" you might pontificate. Well, I too pondered the same perplexity, and answers were not forthcoming. I could find no printed instructions left over from the war. I have since learned that there were a few reenactors out there who chose not to share this info, well, they have been punished. Fortunately, one of the studliest members of the 15th US/1st Fla modified the World War I overcoat rolling procedure and scored a breakthrough. So here are the steps for rolling the overcoat thanks to Matt Wright.

Step One


make sure all the buttons are buttoned but undo the back belt
Lay the overcoat flat and button all the front buttons and the buttons on the cape. However, undo the buttons on the back belt and pull the belt parts out from under the coat. Fold in the sleeves so that they run along the length of the front opening. Next, pull the cape away from the rest of the coat and form a clam-shell with it (check the picture.) Make sure the cape is even both left and right and that the edges of the cape meet evenly away from the coat.

Step Two


fold in the bottom a little more than the rest
Fold in the sides of the coat over the sleeves until they too run evenly along the front opening of the coat. Fold in the bottom of the coat a little more until it roughly has this shape \_/. It will make it easier to roll it tightly later.

Step Three

roll it tightly about halfway up and put your knee on it
Roll the overcoat from the bottom towards the cape tightly and make sure it stays even on the sides. For some reason, this picture didn't come out too well, but the roll is about halfway, or right about where the back belt pieces come across. Once you get a good half-roll, put your knee on the roll to hold it in place.

Step Four

fold in the wings until they cross

While holding the roll with your knee, fold in the to corners of the 'clamshell' until they cross like in the picture. This step is crucial and you will undoubtedly have to unroll and repeat this step many times until you can get just the right
width to make a tight roll. The wing tips need to overlap, however, because they will eventually hold the roll in place. I didn't get a shot of what you do next, but you're smart you can figure it out. Fold the cape piece down (exactly as it is with that overlap) at the collar. You can see the collar line in the picture, it is right above the button. The cape will be facing the roll you are holding with your knee, with the opening in the cape towards said roll.

Step Five


roll it under the two top layers, and onto the crossed cape tips
Now, take the roll with one hand, and grab the top two layers of the cape with the other hand. Simply roll the coat up into the opening, pulling the cape with one hand and rolling with the other. Be careful not to pull out the crossed wings of the cape or you will have to start over. If you find that the roll isn't very tight, roll the coat out of the cape, cross the cape tips a little tighter and try it again.


the finished productan original rollThe photo on the left shows the finished coat. The one on the right is an original overcoat rolled up. Notice the similarity. Admittedly, I don't know if that coat has been rolled since the war, but other period photos I have seen show the same thing. Once you get the coat rolled, you can use it for a pillow, a football, and you can even carry it on your knapsack.

Wednesday, December 1, 2010

Period Dance 101

With the season wound down, I can't let my blog just sit dormant. Since I am a dance master (no matter how debatable that might be) I thought I'd give a brief primer to those who claim to have two left feet. After all, people of the Civil War era did not have television; they found other ways to entertain themselves.  Dance was one of the most common ways to have fun.  If you didn't know how to dance, you were probably raised by wolves and were not much of a social person, anyhow.


I always think it humorous to hear a Civil War soldier say they can't dance any of the period dances--when in reality they're pretty much already doing it when they go out and drill.

That's right--period dance is not all that different from drilling--just moving in a more confined space.  You still start out with your left foot, and you step in cadence.  When drilling someone in the ranks sings, you find it's easy to keep cadence--how much more so when you have a full band?  This is actually one of the most complicated parts of period dance.

I'm not saying you're ready to do all the period dances--some of them are rather complex.  But you are certainly ready to do the simpler and more common dances.  You don't have to worry about remembering the figures--a good dance master will call the figures out until he's confident that everyone can go on their own (just like how the commanding officer will call out your next move when drilling).  All you really need is a quick primer on the most common figures, so that when that figure is called, you'll know what to do.

We'll go over the Virginia Reel, which is the most common of all the period dances.  This is one of the few dances that you will see at every ball and barn dance, so if you only know one dance, The Virginia Reel would be the one to know.

The dance itself can vary from ball-to-ball, but in general the simple figures below will be part of this dance, and these figures cover about eighty percent of all the figures used in the common and simpler dances.  Get this dance down, and you'll have no problem winging it for the remaining of the simpler dances.  You still may need a little assist on some of the more complex dances, but with practice, you'll be able to handle those as well.

Basic rules in period dance:
1. The lady is always to the gentleman's right when standing side-by-side at the start of a dance.
2. Sets (group of dancers) have a head and a foot.  The head is always the end toward the musicians, the foot is always the end away from the musicians.  Only if the set has to be reconfigured due to space restrictions would this be different.  Not all dances use sets--some form a circle around the dance hall.
3. When the lady and gentleman must stand across from each other at the start of a dance, determine which side the lady should be on by facing the head of the set and follow rule #1.  If these rules are ever broken, it is unlikely you are dancing a period dance.

The Virginia Reel is generally performed with six couples in each set.  It can be performed with more or less, but six works the best.

Each of the following figures of the Virginia Reel is performed to eight counts--where each count is one step.

The first figure of the Virginia Reel is "Honor your partner".  This is nothing more than a simple bow. 
Next figure is a right-hand turn.  Give your partner your right hand.  In the center, both of you turn all the way around, and then return to your original place.
Now is the left-hand turn.  Repeat what you did with the right-hand turn, only use your left hand instead.
Follow this with a two-hand turn.  Just do what you did for the right-hand turn, only use both your hands.
Finally, you have what is known as do-si-do, sometimes also called back-to-back.  You and your partner both take three steps forward, passing each other on each other's right side, followed by one step to the right (which now puts both of your backs to each other).  Continue the remaining four steps back to your original place.

If you've had problems with the above, you are probably in remedial training for drill instruction.

At this point, the dance changes so that only the head couple dances.  They start with a sashay down to the foot of the set, followed by a sashay back up to the head.  A sashay is a sideways-skipping step.  If you are not sure about what I mean, position yourself further down the set at the start of the dance and watch the other couples as they do this figure.  No one is going to be particular if you don't get it right, but you don't want to be running down the set.
Once back at the head of the set, the head couple will do what is known as "Reel the Set" or "Strip the Willow"--both are terms for the same figure:
a right-hand turn one and a half times around,
followed by a left-hand turn with the lady on the outside
followed by a right-hand turn with your partner,
followed by a left-hand turn with the next lady in the line.
and continue until you reach the end of the line.


Once at the foot of the set, the head couple sashays back up to the head of the set.  This is followed by what is termed "Casting off", meaning the proceed to turn and walk down the outside of the set. Although not all dancers do this, there is a correct way to turn when casting.  For the gentlemen, it will be counter-clockwise (to your left), while for the ladies, it will be clockwise (to their right).  Turning the other direction looks a bit clumsy and is not as elegant (as well as not being correct).  Sometimes you will see couples honoring each other as they cast.  Although the honor is not really necessary here, I think it does add a nice flair.

All dancers proceed to follow the head couple in casting off.  The head couple will meet at the foot of the set (they'll have to do a best guess as to where that is since there won't be anyone there as markers) and form an arch with each other with both their hands.  It is important to note that they should not try to hold hands (which is common for dancers to do).  The reason is pretty simple--the dancers that have been following now have to go under your arch and step back into the two lines.  If the head couple has locked hands with each other, that arch will be too narrow, as the dancers take their partners hand and try to step under that arch together.  It will also likely be too low for the taller dancers who may have to bow pretty low to get under that arch.   Finally, if that head gentleman is a private, and one of the other dancers is a general--well, it's just not good to make a ranking officer bow to a low-ranking soldier.

Once all the dancers have returned to place, the head couple that just did their arch will drop their hands and be the new foot couple.  There will be a new head couple, and the dance starts again, until all dancers have had a turn at being the head couple.

So, for this dance, we covered the following figures:
Honor
Right-hand turn
Left-hand turn
Two-hand turn
Do-Si-Do
Sashay down the hall and return
Reel the Set (also known as Strip the Willow)
Cast

And that's a basic primer for most dances.  Once you know and can dance the Virginia Reel, you can do most of the dances at the balls held at reenactment events.  There are still a number of figures to learn, but I'll go over those in a different article.

I'm hoping to go over the Virginia Reel at the Regimental Dinner, so if you're in the 1st Tennessee, you'd better brush up on on this article.  I'll see you there.