Wednesday, March 2, 2011

Analysis of the new CCI 4-wing percussion caps for reenactors.


All the sutlers at the Jackson, Michigan event last year that had percussion caps for sale sold the German RWS caps for about $12 for a can of 100 caps.  However, most of these sutlers also had the new CCI 4-wing percussion caps designed for reenactors at $10 for a can of 100—and one sutler sold the caps for $8 for a can.

When the CCI 6-wing caps were available we avoided them—even prohibiting their use—due to their firing hot and ripping apart.  The flying metal could risk injuring a fellow reenactor.

With these new 4-wing caps sold at a significantly cheaper price, I considered it worth investigating into the feasibility of using these as replacements for the German caps.  I purchased one tin for testing.

I fired about 10 caps in Christine (my Springfield), priming only.  All showed the same consistency in firing, and all stayed together.  They seemed to pop about the same as a German cap, perhaps even slightly less, which brought up concerns of possibly misfiring in battle.  However, during Sunday’s battle, up until I was taken out by that cannon, I used the CCI caps exclusively and did not have a single misfire—and all caps continued to show the same pattern after detonation that the prime-only firing showed the night before.

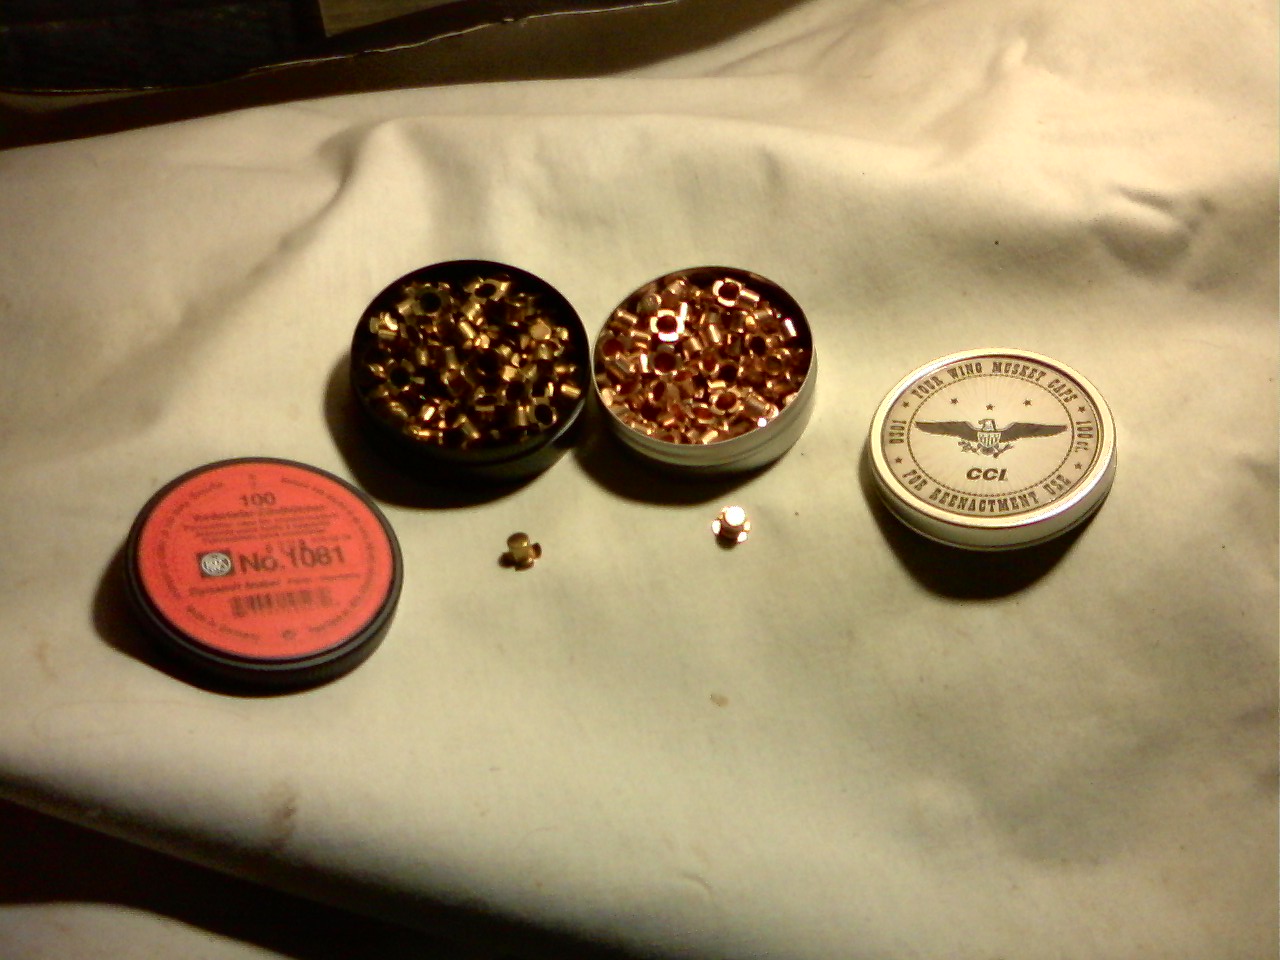
Musket percussion caps.
On the left are the standard German RWS caps,
while the right are the new 4-wing CCI caps.

Therefore, it is my recommendation that we accept the CCI 4-wing Percussion Caps for Reenactors as an alternate and less expensive choice to the German RWS caps.


EDIT (05/24/2011):
In my analysis of the Navy Arms caps (here), I said I would also test the 4-wing CCI caps with a double load, like I did for the failed Navy Arms caps.  At the Sunbury, OH I had my opportunity.  I fired a double load off with a 4-wing CCI cap, and its behavior was similar to the German caps--no tearing or fragmentation.  Therefore I am sticking with my recommendation that the 4-wing CCI caps are safe.

As an additonal note--for funsies, I tested a 6-wing CCI cap with a double load.  I had never really done any kind of testing of the 6-wing caps--I had simply always been told that these can be dangerous and  fragment badly, and took everyone's word for it.  The 6-wing CCI cap does pop quite a bit hotter (ear protection is recommended, even when firing with no powder), but I was quite surprised to find that it did not fragment under such a charge. (I use about 65 grain in my charges, so this was exposed to about 130 grain.)  Granted, I only tested one cap--perhaps this was an exception, but I'd have to say that it is safer to use a 6-wing CCI than it is to use the 4-wing Navy Arms caps.  Still, unless I can see a signficant number tested with no tearing or fragmentation, I'd be much more comfortable knowing the guy next to me was not using them.

EDIT (09/20/2011):
After having used these caps for a season along with fellow reenactors, I have this small update:  the caps tend to leave some excessive residue upon firing.  I don't have much of a problem with this as my nipple has a good sized hole, but others with Enfields and a significantly smaller hole through their nipple have complained of excessive misfires due to this extra residue.  I have had occasional unexplained misfires that could be attributed to the excessive residue.  Fortunately for me, Christine is pretty good about getting over it--once she gets hot, she almost never misfires.

Tuesday, February 1, 2011

Painting your accouterments and Ground Cloth

I have Andrew Mott to thank for the following:

Oilcloth and Painted Accouterments
by Jack Cox

“Painting” was a 1800’s method of waterproofing cloth for such items as knapsacks, haversacks, belts, cartridge boxes and ground cloths. Properly done, the fabric does become very waterproof, but retains its flexibility.

There are many different recipes for both "period accurate" oilcloth and for a modern version that looks the same, but without some of the problems of the 1850's recipe. The paint is generally applied over cotton drill or linen canvas.

The instructions below discuss the making of ground cloths, but the same procedure applies to all painted goods.

Modern Recipe:

While this recipe is obviously not authentic, it produces the same look and feel as the original methods. The final product looks, feels and wears as close to the original as most of us can approximate today. However, you need to make a decision as to whether you want to "fake it" with a modern approximation when a good period recipe is available.

Materials:

Method:

Wallpaper sizing. Get it pre-mixed and ready to use.
Flat black or semi-gloss interior latex paint ***
Boiled linseed oil
Mineral spirits paint thinner
Japan dryer
(All of these materials are available at any good paint store)

1. Using a roller, paint both sides of the cloth with the wallpaper sizing and let it dry. It should take an hour or less. The sizing will prevent the paint from soaking the cloth, and it will give it some "tooth" for paint adhesion.
2. Using a roller, paint one side of the cloth with the black latex paint. Let it dry overnight.
3. Mix 2 parts of mineral spirits with 1 part boiled linseed oil. Add Japan dryer. Use 1 oz. (2 tablespoons) per pint of paint.
4. With a brush, paint the sized side of the cloth with the linseed oil mix. Let it dry. This may take several days, depending on temperature and humidity. It's NOT wise to let it dry in the house.
5. Paint on two additional coats of the linseed oil mix. Let it dry between coats.

*** There is a variation of this recipe that works very well also. Instead of using plain latex paint, mix 2 parts of latex paint with one part of boiled linseed oil. Stir it thoroughly, then follow the instructions above.

Period Recipe:

This recipe is an approximation, since the original recipe specified "litharge," or lead monoxide (PbO) which is extremely poisonous.

Bright Idea: Leave out the lampblack, and you have a recipe for a nice civilian waterproof cloth.

I strongly recommend this recipe because it is about as authentic as you can get without putting life and limb in danger.

Materials:

Boiled linseed oil
Mineral spirits paint thinner (or turpentine)
Lampblack (comes in tubes or dry powder)
Japan dryer
Corn starch

Method:

1. Make a sizing by boiling about a quart of water and adding cornstarch mixed in cold water until the mixture becomes a little syrupy.
2. dry.
3. Mix one part of boiled linseed oil with one part of mineral spirits. Add lamp black until the paint is a very opaque black. Add one oz. (2 tbsp) of Japan dryer per pint.
4. With a brush, paint the cloth with the blackened linseed oil and let dry. This can take several days.
5. Mix one part of boiled linseed oil with two parts of mineral spirits. Add one oz. of Japan dryer per pint.
6. With a brush, paint the cloth with the clear linseed oil mixture and let it dry. This can also take several days. Two coats of this mixture should give the results you want.

(You can omit the cornstarch sizing if you want, but the oil-based paint will pretty much soak the cloth.)

Paint the cloth with the cornstarch sizing and let

Confederate Ordnance Manual Recipe:

There is a recipe from the 1863 Confederate Ordinance manual which I have not tried. Use at your own risk.

Materials:
28 Parts lampblack
1 Part Japan varnish
73 Parts boiled Linseed oil
1 Part spirits of turpentine
1 Part litharge (substitute Japan Dryer for this.

Method:

Litharge is lead monoxide, and is very poisonous.)

1. Mix the ingredients, using 1 oz. (2 tbsp) of Japan dryer per quart of paint.
2. If you don't want the paint to totally soak the cloth, size it with cornstarch as in the period recipe above.
3. Apply 2-3 coats until the desired sheen is obtained.

Turpentine-base Recipe

This recipe comes from "Young's Demonstrative Translation of Scientific Secrets - 1861." This recipe will sound familiar in materials and proportion, but uses turpentine instead of mineral spirits for a thinner. Hazard Warning: The recipe uses litharge*** (poison hazard) and the mixture is boiled (fire hazard).

I DO NOT RECOMMEND OR ENDORSE USING THIS RECIPE.

Materials:

1 pint of spirits of turpentine
1 to 1 1/2 pints of linseed oil
1 lb litharge

Method:

1. Combine all materials in a large metal bucket. Litharge reacts strongly to aluminum and zinc. Do not use an aluminum or zinc coated vessel.
2. Boil and stir until thoroughly mixed and dissolved.
3. Paint on the cloth.
4. Let dry in the sun.

This recipe will give a clear to reddish or yellowish color, depending upon the base color of the litharge. The first coats could be tinted with lamp black to make a glossy painted oilcloth.

*** Safety data (MSDS) for litharge.

Sunday, January 2, 2011

Rolling the Civil War Overcoat

With the 150th anniversary of the first year of the Civil War coming, I've been getting things ready to campaign for one of the major battle re-enactments.  I stumbled onto the below, concerning rolling the great coat and thought I'd share the information. I tried it myself and it does work pretty well.  Below comes from a post by Doug Dobbs at http://www.dougdobbs.com/cwr/greatcoat/rolling%20overcoat.htm.

Rolling the Civil War Overcoat


For all you Federal Reenactors (and you curious Confederates) out there, you may be wondering "how the heck did the original US soldiers carry those overcoats?" of course, you may not care, especially if you don't have an overcoat. But for me, I wanted to know. A little digging turned up the information that the soldiers carried them rolled, and on top of their knapsacks. But, "how did they roll them?" you might pontificate. Well, I too pondered the same perplexity, and answers were not forthcoming. I could find no printed instructions left over from the war. I have since learned that there were a few reenactors out there who chose not to share this info, well, they have been punished. Fortunately, one of the studliest members of the 15th US/1st Fla modified the World War I overcoat rolling procedure and scored a breakthrough. So here are the steps for rolling the overcoat thanks to Matt Wright.

Step One


make sure all the buttons are buttoned but undo the back belt
Lay the overcoat flat and button all the front buttons and the buttons on the cape. However, undo the buttons on the back belt and pull the belt parts out from under the coat. Fold in the sleeves so that they run along the length of the front opening. Next, pull the cape away from the rest of the coat and form a clam-shell with it (check the picture.) Make sure the cape is even both left and right and that the edges of the cape meet evenly away from the coat.

Step Two


fold in the bottom a little more than the rest
Fold in the sides of the coat over the sleeves until they too run evenly along the front opening of the coat. Fold in the bottom of the coat a little more until it roughly has this shape \_/. It will make it easier to roll it tightly later.

Step Three

roll it tightly about halfway up and put your knee on it
Roll the overcoat from the bottom towards the cape tightly and make sure it stays even on the sides. For some reason, this picture didn't come out too well, but the roll is about halfway, or right about where the back belt pieces come across. Once you get a good half-roll, put your knee on the roll to hold it in place.

Step Four

fold in the wings until they cross

While holding the roll with your knee, fold in the to corners of the 'clamshell' until they cross like in the picture. This step is crucial and you will undoubtedly have to unroll and repeat this step many times until you can get just the right
width to make a tight roll. The wing tips need to overlap, however, because they will eventually hold the roll in place. I didn't get a shot of what you do next, but you're smart you can figure it out. Fold the cape piece down (exactly as it is with that overlap) at the collar. You can see the collar line in the picture, it is right above the button. The cape will be facing the roll you are holding with your knee, with the opening in the cape towards said roll.

Step Five


roll it under the two top layers, and onto the crossed cape tips
Now, take the roll with one hand, and grab the top two layers of the cape with the other hand. Simply roll the coat up into the opening, pulling the cape with one hand and rolling with the other. Be careful not to pull out the crossed wings of the cape or you will have to start over. If you find that the roll isn't very tight, roll the coat out of the cape, cross the cape tips a little tighter and try it again.


the finished productan original rollThe photo on the left shows the finished coat. The one on the right is an original overcoat rolled up. Notice the similarity. Admittedly, I don't know if that coat has been rolled since the war, but other period photos I have seen show the same thing. Once you get the coat rolled, you can use it for a pillow, a football, and you can even carry it on your knapsack.

Wednesday, December 1, 2010

Period Dance 101

With the season wound down, I can't let my blog just sit dormant. Since I am a dance master (no matter how debatable that might be) I thought I'd give a brief primer to those who claim to have two left feet. After all, people of the Civil War era did not have television; they found other ways to entertain themselves.  Dance was one of the most common ways to have fun.  If you didn't know how to dance, you were probably raised by wolves and were not much of a social person, anyhow.


I always think it humorous to hear a Civil War soldier say they can't dance any of the period dances--when in reality they're pretty much already doing it when they go out and drill.

That's right--period dance is not all that different from drilling--just moving in a more confined space.  You still start out with your left foot, and you step in cadence.  When drilling someone in the ranks sings, you find it's easy to keep cadence--how much more so when you have a full band?  This is actually one of the most complicated parts of period dance.

I'm not saying you're ready to do all the period dances--some of them are rather complex.  But you are certainly ready to do the simpler and more common dances.  You don't have to worry about remembering the figures--a good dance master will call the figures out until he's confident that everyone can go on their own (just like how the commanding officer will call out your next move when drilling).  All you really need is a quick primer on the most common figures, so that when that figure is called, you'll know what to do.

We'll go over the Virginia Reel, which is the most common of all the period dances.  This is one of the few dances that you will see at every ball and barn dance, so if you only know one dance, The Virginia Reel would be the one to know.

The dance itself can vary from ball-to-ball, but in general the simple figures below will be part of this dance, and these figures cover about eighty percent of all the figures used in the common and simpler dances.  Get this dance down, and you'll have no problem winging it for the remaining of the simpler dances.  You still may need a little assist on some of the more complex dances, but with practice, you'll be able to handle those as well.

Basic rules in period dance:
1. The lady is always to the gentleman's right when standing side-by-side at the start of a dance.
2. Sets (group of dancers) have a head and a foot.  The head is always the end toward the musicians, the foot is always the end away from the musicians.  Only if the set has to be reconfigured due to space restrictions would this be different.  Not all dances use sets--some form a circle around the dance hall.
3. When the lady and gentleman must stand across from each other at the start of a dance, determine which side the lady should be on by facing the head of the set and follow rule #1.  If these rules are ever broken, it is unlikely you are dancing a period dance.

The Virginia Reel is generally performed with six couples in each set.  It can be performed with more or less, but six works the best.

Each of the following figures of the Virginia Reel is performed to eight counts--where each count is one step.

The first figure of the Virginia Reel is "Honor your partner".  This is nothing more than a simple bow. 
Next figure is a right-hand turn.  Give your partner your right hand.  In the center, both of you turn all the way around, and then return to your original place.
Now is the left-hand turn.  Repeat what you did with the right-hand turn, only use your left hand instead.
Follow this with a two-hand turn.  Just do what you did for the right-hand turn, only use both your hands.
Finally, you have what is known as do-si-do, sometimes also called back-to-back.  You and your partner both take three steps forward, passing each other on each other's right side, followed by one step to the right (which now puts both of your backs to each other).  Continue the remaining four steps back to your original place.

If you've had problems with the above, you are probably in remedial training for drill instruction.

At this point, the dance changes so that only the head couple dances.  They start with a sashay down to the foot of the set, followed by a sashay back up to the head.  A sashay is a sideways-skipping step.  If you are not sure about what I mean, position yourself further down the set at the start of the dance and watch the other couples as they do this figure.  No one is going to be particular if you don't get it right, but you don't want to be running down the set.
Once back at the head of the set, the head couple will do what is known as "Reel the Set" or "Strip the Willow"--both are terms for the same figure:
a right-hand turn one and a half times around,
followed by a left-hand turn with the lady on the outside
followed by a right-hand turn with your partner,
followed by a left-hand turn with the next lady in the line.
and continue until you reach the end of the line.


Once at the foot of the set, the head couple sashays back up to the head of the set.  This is followed by what is termed "Casting off", meaning the proceed to turn and walk down the outside of the set. Although not all dancers do this, there is a correct way to turn when casting.  For the gentlemen, it will be counter-clockwise (to your left), while for the ladies, it will be clockwise (to their right).  Turning the other direction looks a bit clumsy and is not as elegant (as well as not being correct).  Sometimes you will see couples honoring each other as they cast.  Although the honor is not really necessary here, I think it does add a nice flair.

All dancers proceed to follow the head couple in casting off.  The head couple will meet at the foot of the set (they'll have to do a best guess as to where that is since there won't be anyone there as markers) and form an arch with each other with both their hands.  It is important to note that they should not try to hold hands (which is common for dancers to do).  The reason is pretty simple--the dancers that have been following now have to go under your arch and step back into the two lines.  If the head couple has locked hands with each other, that arch will be too narrow, as the dancers take their partners hand and try to step under that arch together.  It will also likely be too low for the taller dancers who may have to bow pretty low to get under that arch.   Finally, if that head gentleman is a private, and one of the other dancers is a general--well, it's just not good to make a ranking officer bow to a low-ranking soldier.

Once all the dancers have returned to place, the head couple that just did their arch will drop their hands and be the new foot couple.  There will be a new head couple, and the dance starts again, until all dancers have had a turn at being the head couple.

So, for this dance, we covered the following figures:
Honor
Right-hand turn
Left-hand turn
Two-hand turn
Do-Si-Do
Sashay down the hall and return
Reel the Set (also known as Strip the Willow)
Cast

And that's a basic primer for most dances.  Once you know and can dance the Virginia Reel, you can do most of the dances at the balls held at reenactment events.  There are still a number of figures to learn, but I'll go over those in a different article.

I'm hoping to go over the Virginia Reel at the Regimental Dinner, so if you're in the 1st Tennessee, you'd better brush up on on this article.  I'll see you there.

Monday, November 8, 2010

The Burning of Guyandotte

I've heard stories of the Guyandotte re-enactment, but have never been there.  I've heard of being well fed, but I've heard of other things that made me worry.

One of my biggest concerns was for cold weather, which is expected this time of year.  However, this year was unseasonably warm and sunny--I was only a little cold Sunday morning when I ran out of propane for my heater.

The event was better than I expected.  A small, in-town type of event fought on the streets of the little community inside Huntington WV, on the actual location of a Civil War battle, fought in November 1861, making next year the 150th for this event.

If you don't like street fighting, this would not be an event for you.  The streets were well blocked off, and many of the buildings in the area were survivors from the actual battle.  Not all the modern inconveniences can be eliminated, as you might find at an event in a park, but it is still a good event.

Three of us from the 1st Tennessee fell in with the 5th Kentucky for the weekend.  Being a more laid-back event, there's not really much I can say about it.  They did feed us two breakfasts and two lunches, which is more than every other event, but we were on our own for Saturday dinner--but it was a short walk to a local diner.

For the battles, I had to get used to fighting using Gilham's tactics--the 1st Tennessee uses Hardee's, while the 5th Kentucky uses Gilham's.  Most of the commands are similar, but shoulder arms kept throwing me--when you have to hold the rifle on the left shoulder instead of at your right side, motions for all commands end up completely different.  Even support arms threw me--there wasn't enough movement--I kept thinking there had to be something I was missing when all you have to do is bend your elbow.

All I know about the Saturday battle is that I still had a lot of rounds left--while I completely finished off my season's rounds in the Sunday battle.  I guess us Confederates are better at making a battle last when it's our turn to die. 


H.K. Edgerton leads us with the Colors.
Photo courtesy of Herald-Dispatch
The one thing that really stood out for the Saturday battle was something I have never seen at a reenactment--a black Confederate (H.K. Edgerton) in our lines.  He was there for a special impression as a black Confederate soldier--he acted as our flag bearer during the battle, waving the Confederate battle flag.  We need more of that type of impression--too many people have no clue what the war was really about.  If they know anything at all about the war, too often they think it was about slavery.

Slavery was only added halfway through the war as an excuse by Abraham Lincoln to continue the war--it was not what started it.  Mr. Edgerton is at the heart of what even our reenacting is all about--preserving our heritage.   In putting together this post I stumbled onto some posts of those who think Mr. Edgerton crazy.  But they miss the point.  As George Santayana stated, "Those who cannot remember the past are condemned to repeat it."  History may be written by the victors, but if the victors lose sight of the truth, the truth will enslave them.  It is only by knowing the truth are we set free. 

I hope to run into Mr. Edgerton again at another event. 

His website is http://www.southernheritage411.com/.

Tuesday, October 12, 2010

Hartford City Civil War Days, 2010

Hartford City has always been one of my favorite events every year.  A large event that pretty much closes out the season.  Plenty (almost too much) of things to keep us busy, weather usually a touch cool (perfect wool weather), lots of sutlers, and a good tactical.

Unfortunately, the cool weather part didn't work out this year--it almost felt like the Jackson, MI event.  Since when does October have temperatures in the 80s?

But it was nice and dry--a great change from last year.  The 1st Tennessee set camp in their usual spot on the north side of the high knoll, near the artillery raising the 1st national flag about 30 feet from where the 3rd national flag waved (which struck me as a bit odd).

Saturday did seem to start mighty early for us.  First call for morning battalion drill came at 8 am.

This year's theme reenacted the Battle of Gettysburg--meaning that we lose every battle.  Probably just as well: we've begun to feel like the only way we can get the Federals out on the field is to promise them victory.

Sgt. Mott pickets at his tent.
As a side note, if you are reading my blog, you might be looking forward to reading my perspective on the battles.  Unfortunately, being a private, I can't really give you much.  Although I enjoy the battles, my perspective is rather narrow-visioned.  I have soldiers to both sides of me and in front of me (I'm usually in the rear rank), focus on following the captain's, lieutenant's, or sergeant's orders, and on loading, aiming, and shooting at the blue coats I see.  Describing a battle afterward to anyone would involve adding only the small variations that happen to stand out, plus any embellishments I find amusing.

Saturday afternoon the event held a pumpkin carving contest.  Our 1st Sergeant, or at least his effigy, won 1st place, when he was placed as a picket in front of his dog tent.


We were introduced to Steve Winston's new tent-mate, Fred Smith.  Sunday morning we carried Fred around in his casket to the undertaker and a few of the Confederate units to show him off and get some amusement.  There were some public that watched and got some enjoyment out of the scenario delivered to the unsuspecting undertaker. 


Fred Smith is a bit worn out.


Jeff Davis takes a nap.
I think Steve's got too much time on his hands.  But he is certainly the best Jefferson Davis impersonator I've ever seen, and he's not even trying!  I think he should work out a first person impression of Jeff Davis.  Although he's napping in the picture to the left, you can really see the resemblance.  Put a planter's hat on him, and Steve would pass as Davis's double.


The Virginia Reel at the Military Ball
As much as I wanted to be a part of the Euchre playing that evening (J.R. Sharp and Gary Evens wanted to end the season on a winning note), I needed to head off to the military ball as the caller.  The one thing about Hartford City that I'd like to see changed is that the ball be held on-site instead of off-site at the local 4H building.  I've heard from several reenactors say that it would be nice if it could be held on the campgrounds.  As many participants as we get, I'm not sure how feasible this would be, but it might work if held in a flat open space with plenty of lanterns for light.  The rounders field could work.  But anyway, I do enjoy calling this ball, and it seems to get better every year.  This year started a little later than I would have liked (8:30), but to my surprise a substantial sized group still danced up to midnight.  The Tri-County Revelers were my musicians--a great band to work with--they'll basically do anything you ask.  I haven't worked with too many different bands, but I've been with some bands where they'll say something like, "We're contracted to 11 p.m., so we're out of here at 11 p.m."  The Tri-County Revelers are more than willing to go as long as I, and I'll go until either the dancers have had enough or I'm ready to drop.  I ended the night thinking, "Maybe I can do one more", but kept remembering a quote from Milton Berle--"Always leave them wanting more".  There's nothing like ending the night on that note.


This event was the only for me that had a tactical not canceled due to lack of Yankee turnout.  If you don't reenact, you wouldn't know about the tacticals.  These are battles with basic rules held without the public--where either side could win based on the rules of the game.  This tactical was one of the better ones I've been involved with.  Our company double-quicked around most of the campgrounds to meet up with a vanguard federal unit.  I recognized Jeff Stein with his long white beard in the Federal numbers.  We followed a kind of Jack-in-the-box tactic.  When the Federals weren't expecting it, we double-quicked from behind some trees into formation in the open, fired one company volley at them, then withdrew back to the trees before the Federals could react.  At one point, we saw them through the trees at an "Aim" stance, all guns pointed to where we would form if we popped out again--so we just waited until they got bored.  J.R. and Gary Shaw meandered to the flank and fired some pop shots to divert them, and when those blue-coats fired a volley toward J.R. and Gary, we ran out again, fired a company volley, and charged, taking them all prisoner.  I overhead Jeff Stein laughing about how we'd suddenly be there, then were gone.  The tactical was a victory for the Confederacy.  Afterward, our colonel suggested that next year we could take off our jackets and play the Yankee side while the Federals could play the Rebel side--so that for one year we could say the tactical victory went to the Yankees.

The day ended with Pickett's Charge.  I remember doing this battle four years ago at this event as a Federal, so it was pretty cool to be doing the other side this time.  They told me I'd probably only fire about three shots or so--but fortunately I stashed between thirty and forty rounds in my cartridge box, anyhow.  Every ten to twenty yards they had us stop to perform some dramatic battalion fire, which is cool even if inaccurate.  About 40 yards from the fence Sgt. Shaw asked us to take more hits. I was about out shots, so went down.  When I take a hit, I always fall so that my musket is in my grasp--maybe due to the amount of money I have in it, but I make sure it doesn't get messed up and know where it is.  This time I ended up rather tangled around the rifle, so Gary, in the kindness of his heart, thought he'd assist and move the musket.  I don't really know what he was thinking, but when I heard, "Damn, that's hot!" it felt like I had a newbie next to me.  Gary, you know those guns get hot.

Anyway, it was a good event, and I look forward to this event next year.  The 1st Tennessee is done for the year, but three of us (myself included) still have Guyandotte next month.  I've never been there, so I'm looking forward to something different--I just hope I can keep warm.  We'll be falling in with the 5th Kentucky.

Monday, October 4, 2010

Fall Gathering at Aukerman Creek

The timeline event at Aukerman Creek this past weekend (October 1 & 2, 2010) was nice and relaxing, as you can see by this photo of Gary Shaw.

Gary is proud of our improvised windbreak.


It was cold and rainy on Saturday, but just a bit cold on Sunday--and when you're wearing lots of wool, cold is not bad--rainy is bad.  But we had a fly to keep dry and plenty of time for Euchre.

No Federals showed up, which kind of hampered our itching for burning powder.  But, since it was a timeline event, we just chose to shoot at different enemies.  The Indian Creek Regulators, which our captain was with this weekend--instead of us--and they gave us some fun--I think the captain's still a little sore from his Euchre whuppin' at Jackson, MI, so he's probably looking for any excuse he can to shoot me.  The Nazi also played a bit--I don't think he had a side--he seemed to only shoot from the winning side.  We finished the weekend with members of the 27th Virginia--most of them (about 4) playing horse-thieves or something while the three of us from the 1st Tennessee fell in under their captain and gunned them down.

It wasn't a weekend to take all that seriously, but we were able to provide some education to the public as well as have some relaxing fun.  Hopefully next year we'll see a bigger turnout--at least some Federals--and we can get a big shoot-out going.